“Not so devilish” noodles

Shirataki noodles are thin, translucent, gelatinous traditional Japanese noodles made from the konjac yam (aka devil’s tongue yam or elephant yam).  They are mostly comprised of glucomannan starch, which is an indigestible fiber.  While very low in carbohydrates and calories and lacking much flavor of their own, shirataki noodles easily pick up the flavors of whatever sauce they are in.  Their slippery texture may be a little unfamiliar to some, but dry roasting them in a non-stick pan can give them more of a pasta-like consistency.

Convenience-wise, shirataki noodles couldn’t be easier – just drain, rinse, and then use!  J. Kenji López-Alt from Serious Eats even has a great recipe for  Sichuan-style shirataki noodle and cucumber salad and sings their praises here.

Shirataki noodles stir-fried with vegetables provided a quick and healthy weeknight dinner.  No need to feel ‘devilishly’ indulgent, here!

IMG_3421Shirataki Noodles with Mushrooms and Sweet Bell Pepper

Ingredients:

  • 7 oz shirataki noodles
  • 4 oyster mushrooms, sliced
  • 4-5 crimini mushrooms, sliced
  • 4-5 baby bell peppers, julienned
  • 3 scallions, sliced into 1 inch segments, white and green parts separated
  • 1/2 tsp black bean soy paste
  • 1/2 tsp sugar
  • 2 tsp low-sodium soy sauce
  • 2 tsp canola oil
  • 1/2 tsp sesame oil
  • 2 cloves garlic, minced
  • 1 tsp sriracha
  • Salt to taste
  • Toasted sesame seeds (optional)

Instructions:

  1. Drain and rinse shirataki noodles.  Set aside.
  2. In a nonstick skillet, heat canola oil over medium-high heat.
  3. Add oyster and crimini mushrooms with a pinch of salt to the pan and stir-fry for 1-2 minutes, until they begin to soften and slightly brown at the edges.  Add minced garlic, soy paste, sugar, and 1 tsp low-sodium soy sauce.  Stir-fry for another 1-2 minutes.
  4. Add bell peppers and the chopped white scallion, stir-frying until crisp tender.
  5. Add drained shirataki noodles to the vegetable mixture, seasoning with remaining 1 tsp low sodium soy sauce, sesame oil, and sriracha.  Toss in chopped green scallion and  stir-fry for another 1-2 minutes to let the flavors meld.   Adjust seasoning.
  6. Garnish with toasted sesame seeds and serve immediately.
Advertisement

It’s matcha time!

A double rainbow to greet the day :)
A double rainbow to greet the day 🙂

I have always loved tea.  Growing up, one of my favorite memories was having tea with my sisters and dad when he came home bearing gifts of sweets from his clients, usually around Autumn Moon festival (mooncakes!), Lunar New Year, or Christmas.  It was a little tradition we had, to gather around a pot of tea with him and share the sweets.  To this day, I can not have sweets without a freshly brewed pot of tea.  It is my warm, comforting beverage of choice, and I could sip on it all day long.

Matcha is the only form of tea in which the entire leaf is consumed.  The tea leaves are carefully tended in shade just prior to the harvest, so that the leaves are more delicate and flavorful.  They are then hand picked and carefully steamed, dried, and then stone-ground into the finest powder.   The Japanese tea ritual revolves around the making and tasting of matcha, ceremoniously highlighting its nuanced flavors and delicacy.

In addition to its sweet, vegetal flavor, matcha is loaded with antioxidants and vitamins.  Various studies have tried to link its high catechin polyphenol content to decreased risk of certain types of cancer, lower cholesterol, improved metabolism, and improved cardiovascular health.

I indulged and used matcha to make these lovely, light Matcha Tea Cake cookies for a friend’s baby shower.  With a cup of tea, they make the perfect light treat for a quiet afternoon.  J has decided to dub these “Shrek cookies” because of their color, even though I think they are a pretty shade of green.  :-/

IMG_3319

Matcha Tea Cake cookies (makes 2 dozen), recipe from Food and Wine

Ingredients:

  • 2 cups all-purpose flour
  • 2 teaspoons baking powder
  • 1/2 teaspoon kosher salt
  • 1/8 teaspoon ground cardamom (or cinnamon)
  • 3/4 cup granulated sugar
  • 2/3 cup canola oil
  • 2 large eggs
  • 1/2 teaspoon pure vanilla extract
  • 1/4 teaspoon pure almond extract
  • 2 tablespoons plus 1 teaspoon matcha tea powder
  • 1/4 cup confectioners’ sugar

Instructions:

  1. In a medium bowl, whisk the flour, baking powder, salt and cardamom. In another bowl, whisk the granulated sugar, oil, eggs and vanilla and almond extracts. In a small bowl, stir 2 tablespoons of the matcha powder with 2 tablespoons of water, then stir into the wet ingredients. Stir the wet ingredients into the flour mixture just until combined.
  2. Using a 1-ounce ice cream scoop or 2 tablespoons, scoop 1-inch balls of dough at least 
2 inches apart onto 2 baking sheets lined with parchment paper. Refrigerate for at least 20 minutes.IMG_3312
  3. Preheat the oven to 350°. Bake the cookies for about 
10 minutes, until set at the edges and very lightly browned on the bottoms. Let the cookies cool for 10 minutes, then transfer to a rack to cool completely.
  4. Arrange the cookies on 1 baking sheet. In a sieve, combine the confectioners’ sugar with the remaining 1 teaspoon of matcha. Dust over the cookies and serve.IMG_3315
MAKE AHEAD The cookies can be stored in an airtight container for up to 3 days. Dust with the matcha sugar before serving.

Happy New Year!

IMG_3030 Cung chuc tan xuan!  Xin nian kuai le! Growing up, I took for granted that we would always celebrate Lunar New Year by going over to our grandparents’ house, where my grandfather would put on his traditional blue robes and gift us with lucky red envelopes after we had wished him “prosperity, happiness, and more than 100 years of long life.”  He never seemed to mind hearing that over and over ;).  I did not realize then how much I had internalized or how much I would miss the traditions my parents sought to pass on to us, even as they lamented how U.S. celebrations paled in comparison to their memories.  I used to dress up with my friends in grade school and give our classmates a mini-presentation on Lunar New Year traditions and foods.  I should have had an inkling then of how much I had absorbed.

My first lunar new year away from my family was buffered by being in Boston, where there was a vibrant Asian community and college student groups got together to share the holiday.

In medical school, however, I had a taste of the disappointment my parents likely felt the first time they celebrated after leaving their homeland.  While I was excited by the holiday and its associations with spring (in California, anyway), my classmates were surrounded by snow piled several feet high and oblivious to why they should think about wearing red or eating noodles, sticky rice cakes, or dumplings.  So…I took matters into my own hands, and decided that I would cook as much as I could on my own.  I spent an entire day making nian gaoluo bo gaojiao zi, abalone, fish, noodles, chinese broccoliand cha gio.  It was a little crazy, but the best form of procrastination I could have wished for, and brought the holiday spirit even all the way out to the snowy tundra.

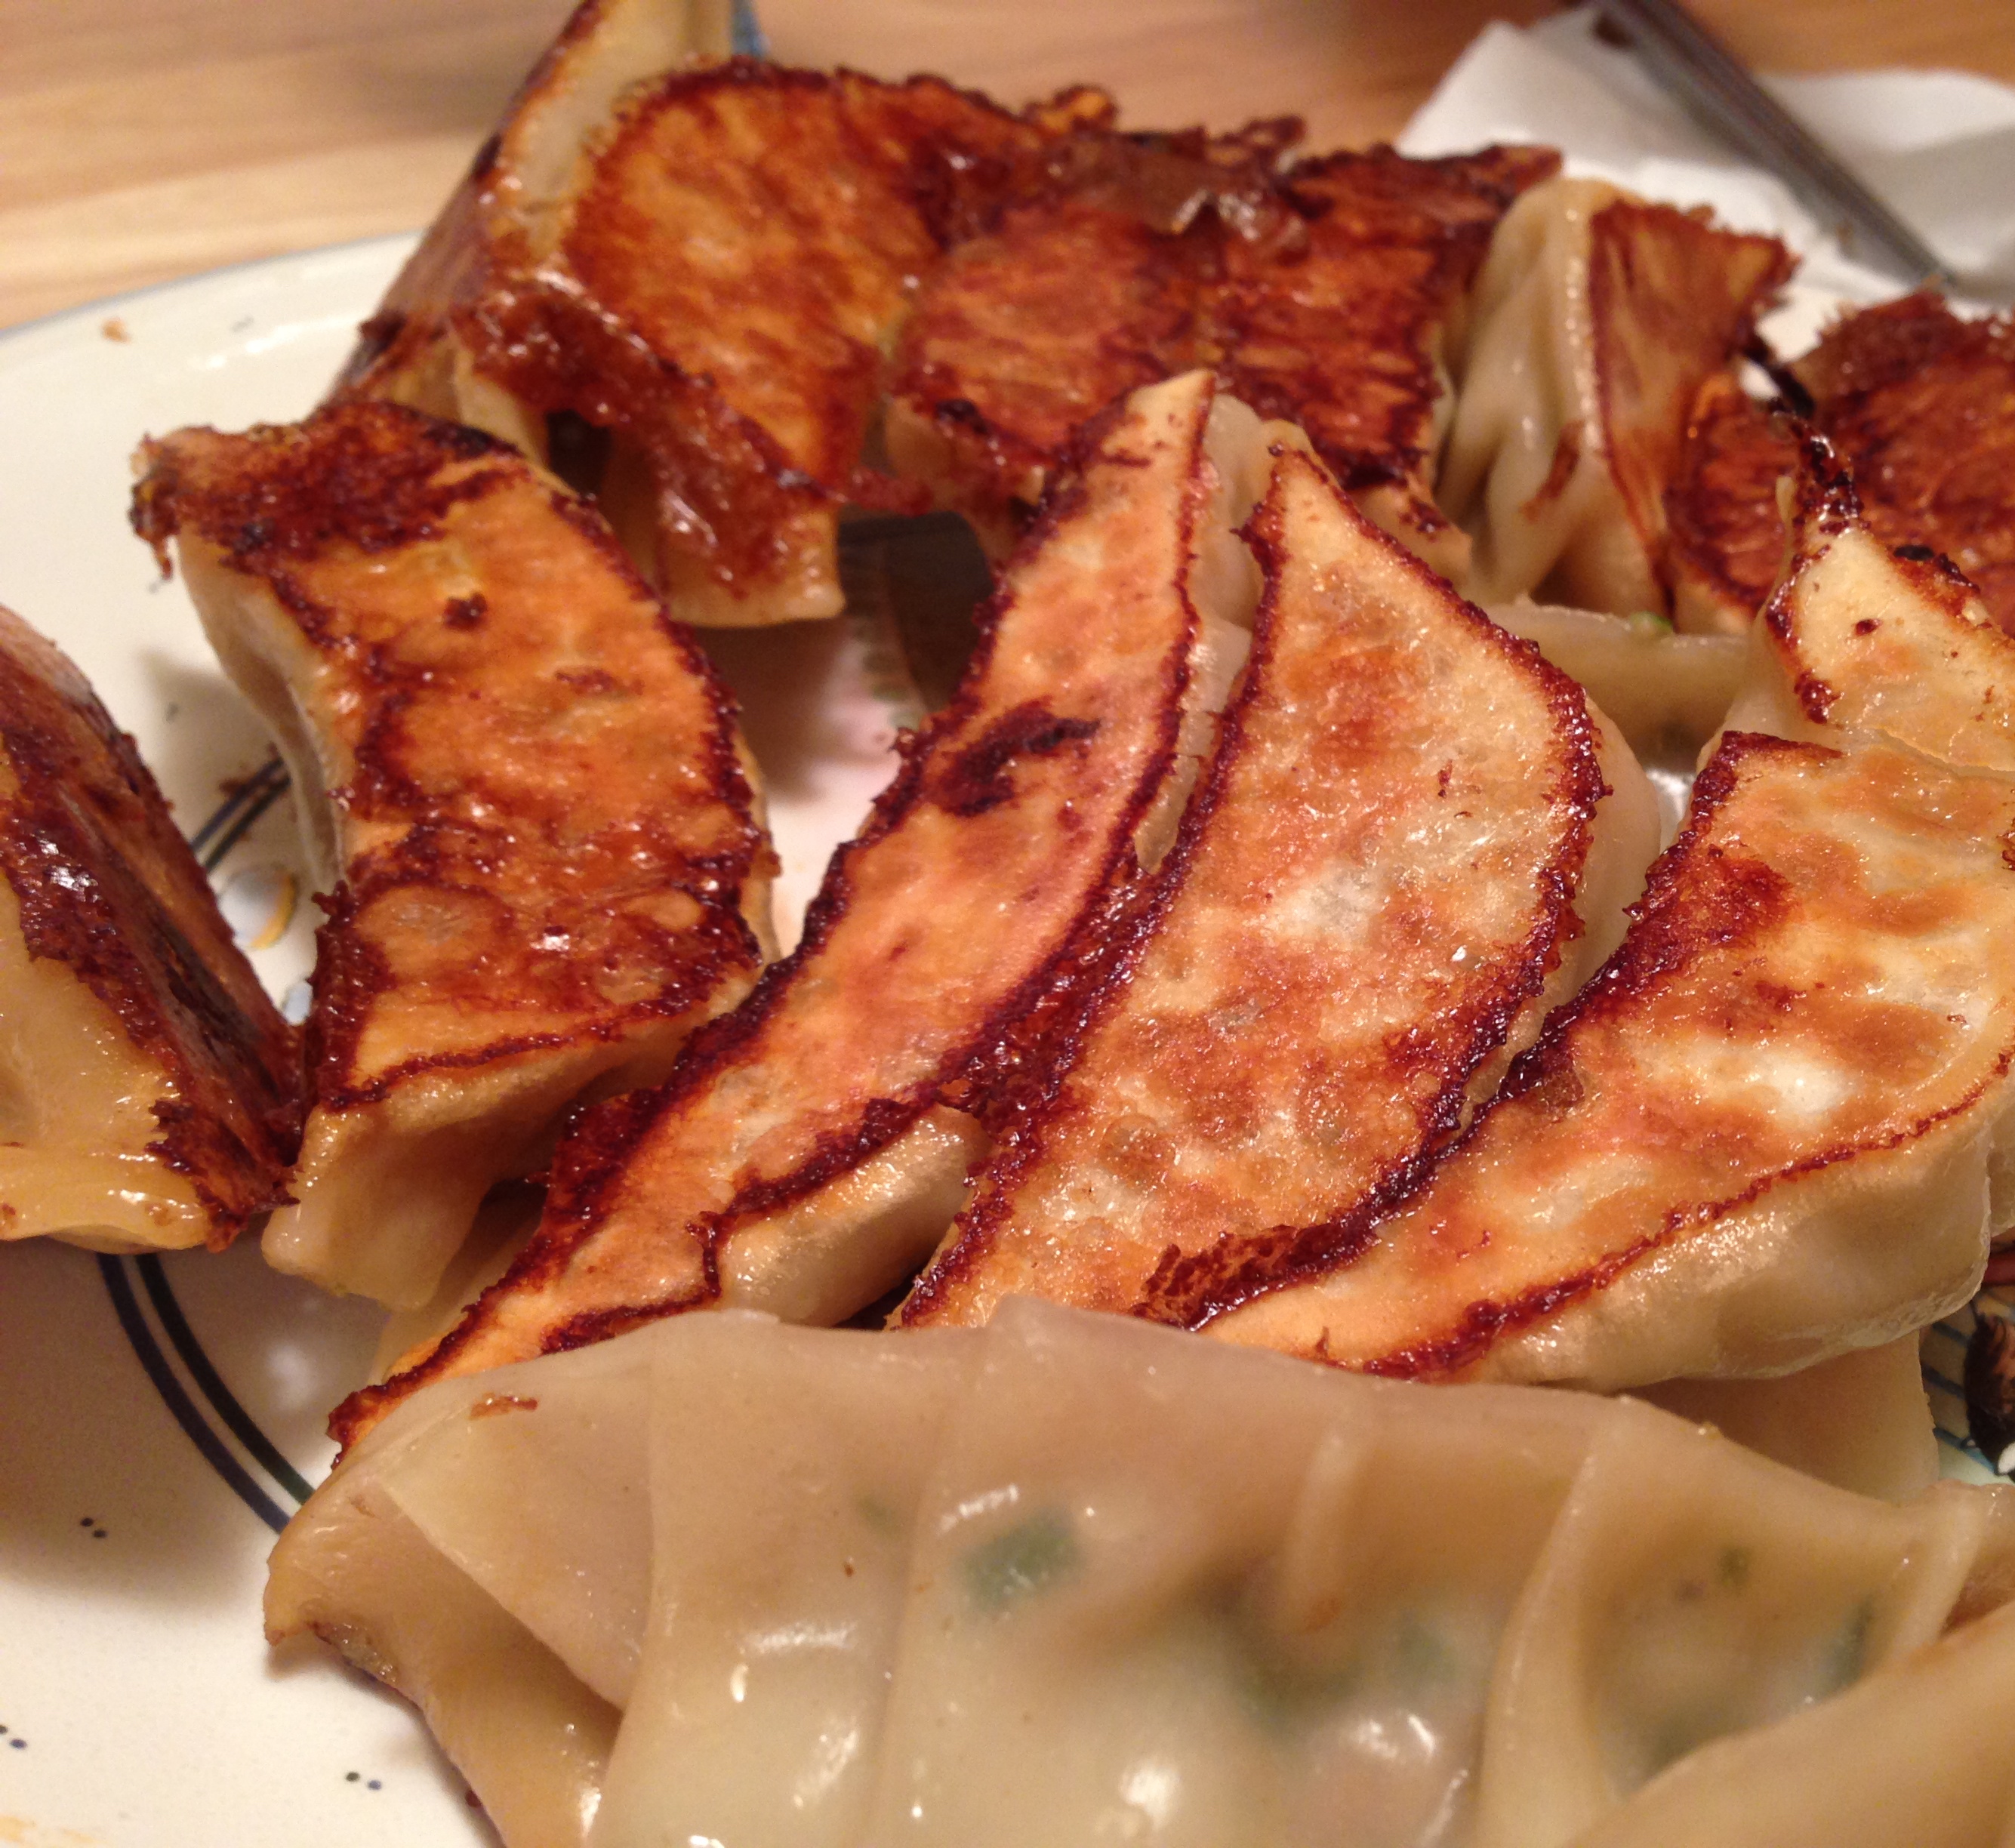
J loves dumplings so much that he has a bottomless stomach for them, so we made a batch a little while ago.  It seemed appropriate to make some today, and perhaps to share our recipe version.  As with many home recipes, quantities are more like guidelines and should be adjusted to personal preference.

Pork, shrimp, and leek dumplings (makes ~90)

Ingredients:

3 packages of round dumpling skins (about 3o per pack)
1 lb ground pork (not too lean)
1/2 lb shrimp, shelled, deveined, and finely minced
1/2 bunch of chinese chives, finely minced (about 3 cups chopped)
~1/2 napa cabbage, finely chopped (about 4 cups chopped)
~1-2 tsp grated ginger (optional)
kosher salt, divided use
freshly ground pepper
~1 tbl oyster sauce
~2 tbl soy sauce
~1 tbl Shaoxing wine
~1 tbl sesame oil
~1 tsp sugar
small bowl of water (for sealing the wrappers)
canola oil (for cooking)

Instructions:

  1. Lightly salt chopped cabbage and set aside for about 15 minutes at room temperature.  Squeeze cabbage in a cheesecloth, clean dish towel, or your hands to drain excess water.
  2. Combine pork, shrimp, napa cabbage, chives, and ginger in a large mixing bowl.  Season with oyster sauce, soy sauce, Shaoxing wine, sesame oil, and sugar, using hands if necessary to mix very well.  Check seasoning by cooking a small dollop of the mixture in a skillet over medium heat.  Adjust with further salt, sugar, and pepper to taste.
  3. Working with one wrapper at a time in the palm of your hand, spoon ~1 tbl of the filling onto the center of the wrapper.  Moisten the outer edge of one side of the wrapper with your index finger.  Fold one edge over and pleat – you can start from one end and pleat to the other, or pinch the middle together first and pleat from the middle to the end, one side at a time.  Be sure to press pleats tightly to seal. *
  4. To cook, you will need to cook in batches since they can only be cooked one layer at a time.  Heat 1-2 tbl canola oil in a nonstick pan (ceramic, cephalon, etc) over medium high heat.  Place the dumplings in one layer (flat side down) into the pan.  They should sizzle!  Let the dumplings cook about 2-4 minutes so that the bottoms become golden brown.  Add enough water so that there is about 1/4 inch of water in the pan, cover, and reduce heat to medium.  Cook for another 5-7 minutes, or until the water evaporates and you again hear the sizzling.
  5. Serve hot, with soy sauce, which can be mixed with black vinegar, sesame oil, hot chili sauce, chopped ginger, garlic, and/or scallions.

IMG_3027 IMG_3029

*if freezing, place dumplings in single layer on a tray and freeze the entire tray until the dumplings are frozen. Then remove them and pile them individually into a freezer bag.

Packing in the veggies!

When I was studying in the Midwest, I used to crave the foods I had no hope of finding anywhere nearby: jiao zi, luo bo gao, dolsot bibimbap, kimchi, pho, banh xeo, bun rieu, Vietnamese cha gio…the list went on and on.  The homesickness for the diversity of Asian cuisine drove me to the kitchen, where I tried to recreate the tastes from memory and by researching the internet or cookbooks.  Some people received care packages with sweets and treats; my mother shipped me Asian ingredients and sent me back to school with suitcases stuffed with gai lan, which was not readily available where I was living.

I still love buying and preparing Asian vegetables, which shine in the simplest of preparations.  Living in a part of the country with amazing produce also helps.  Inspiration is always around the corner at the next farmer’s market!

I made this simple miso-glazed broiled eggplant the other night for a light dinner, and couldn’t wait until the next day to have the leftovers for lunch.  Enjoy!

Miso-glazed eggplant
IMG_3046

Ingredients:

  • 1 tbl mirin
  • 1 tbl sake
  • 2 tbl shiro miso
  • 2 tbl sugar
  • 1 tsp grated fresh ginger
  • 2 Japanese eggplants, halved lengthwise
  • 1/2 tsp sesame oil
  • toasted sesame seeds (garnish)
  • green onions sliced on the bias (garnish)

Directions:

  • Preheat the oven to 425°F.
  • Place the mirin, sake, and sugar in a small saucepan and bring to a simmer over medium heat.  Add miso and ginger and stir until smooth.  Reduce heat to low and continue to cook, stirring occasionally, while you prepare the eggplants.
  • Score the cut sides of the eggplant with diagonal cuts.  Brush the cut sides of the eggplants with sesame oil. Put the eggplants cut-side down on a baking sheet and roast  in the oven for about 15-20 minutes until they just start to shrivel. The flesh should be fork tender. Remove from the oven and carefully turn them over.
  • Brush the top of the eggplants with a good layer of the miso sauce (use up all the sauce!) and put them under the broiler until the sauce bubbles up and starts to caramelize, about 1-2 minutes. Remove from heat, garnish with toasted sesame seeds and green onions, and enjoy!