On lemons and sweet spring treats

It’s so interesting to see how the palate evolves as we age, and how things that may  appeal to us as adults really did not hold much allure when we were younger.  I was reminded of this last weekend when I was trying to decide what to bake to bring to a friend’s son’s birthday party.  Her son is allergic to eggs, so I wanted to bring something egg-less and spring-y that he might still be able to try.  Fortunately, she is also a wonderful mother/cook/baker, so she has already figured out ways to bake him yummy treats sans eggs, including his super-cute Cars-themed birthday cupcakes.

I settled on lemon shortbread (he likes citrus!) and more conventional sugar cookies to provide both options for those with and without allergies.  I’m not sure how the kiddos responded to the lemon shortbread, since I eventually realized that   the humble-looking shortbread is not as appealing a cookie to them as something w/ melty chocolate or drizzled with luscious icing.  =(

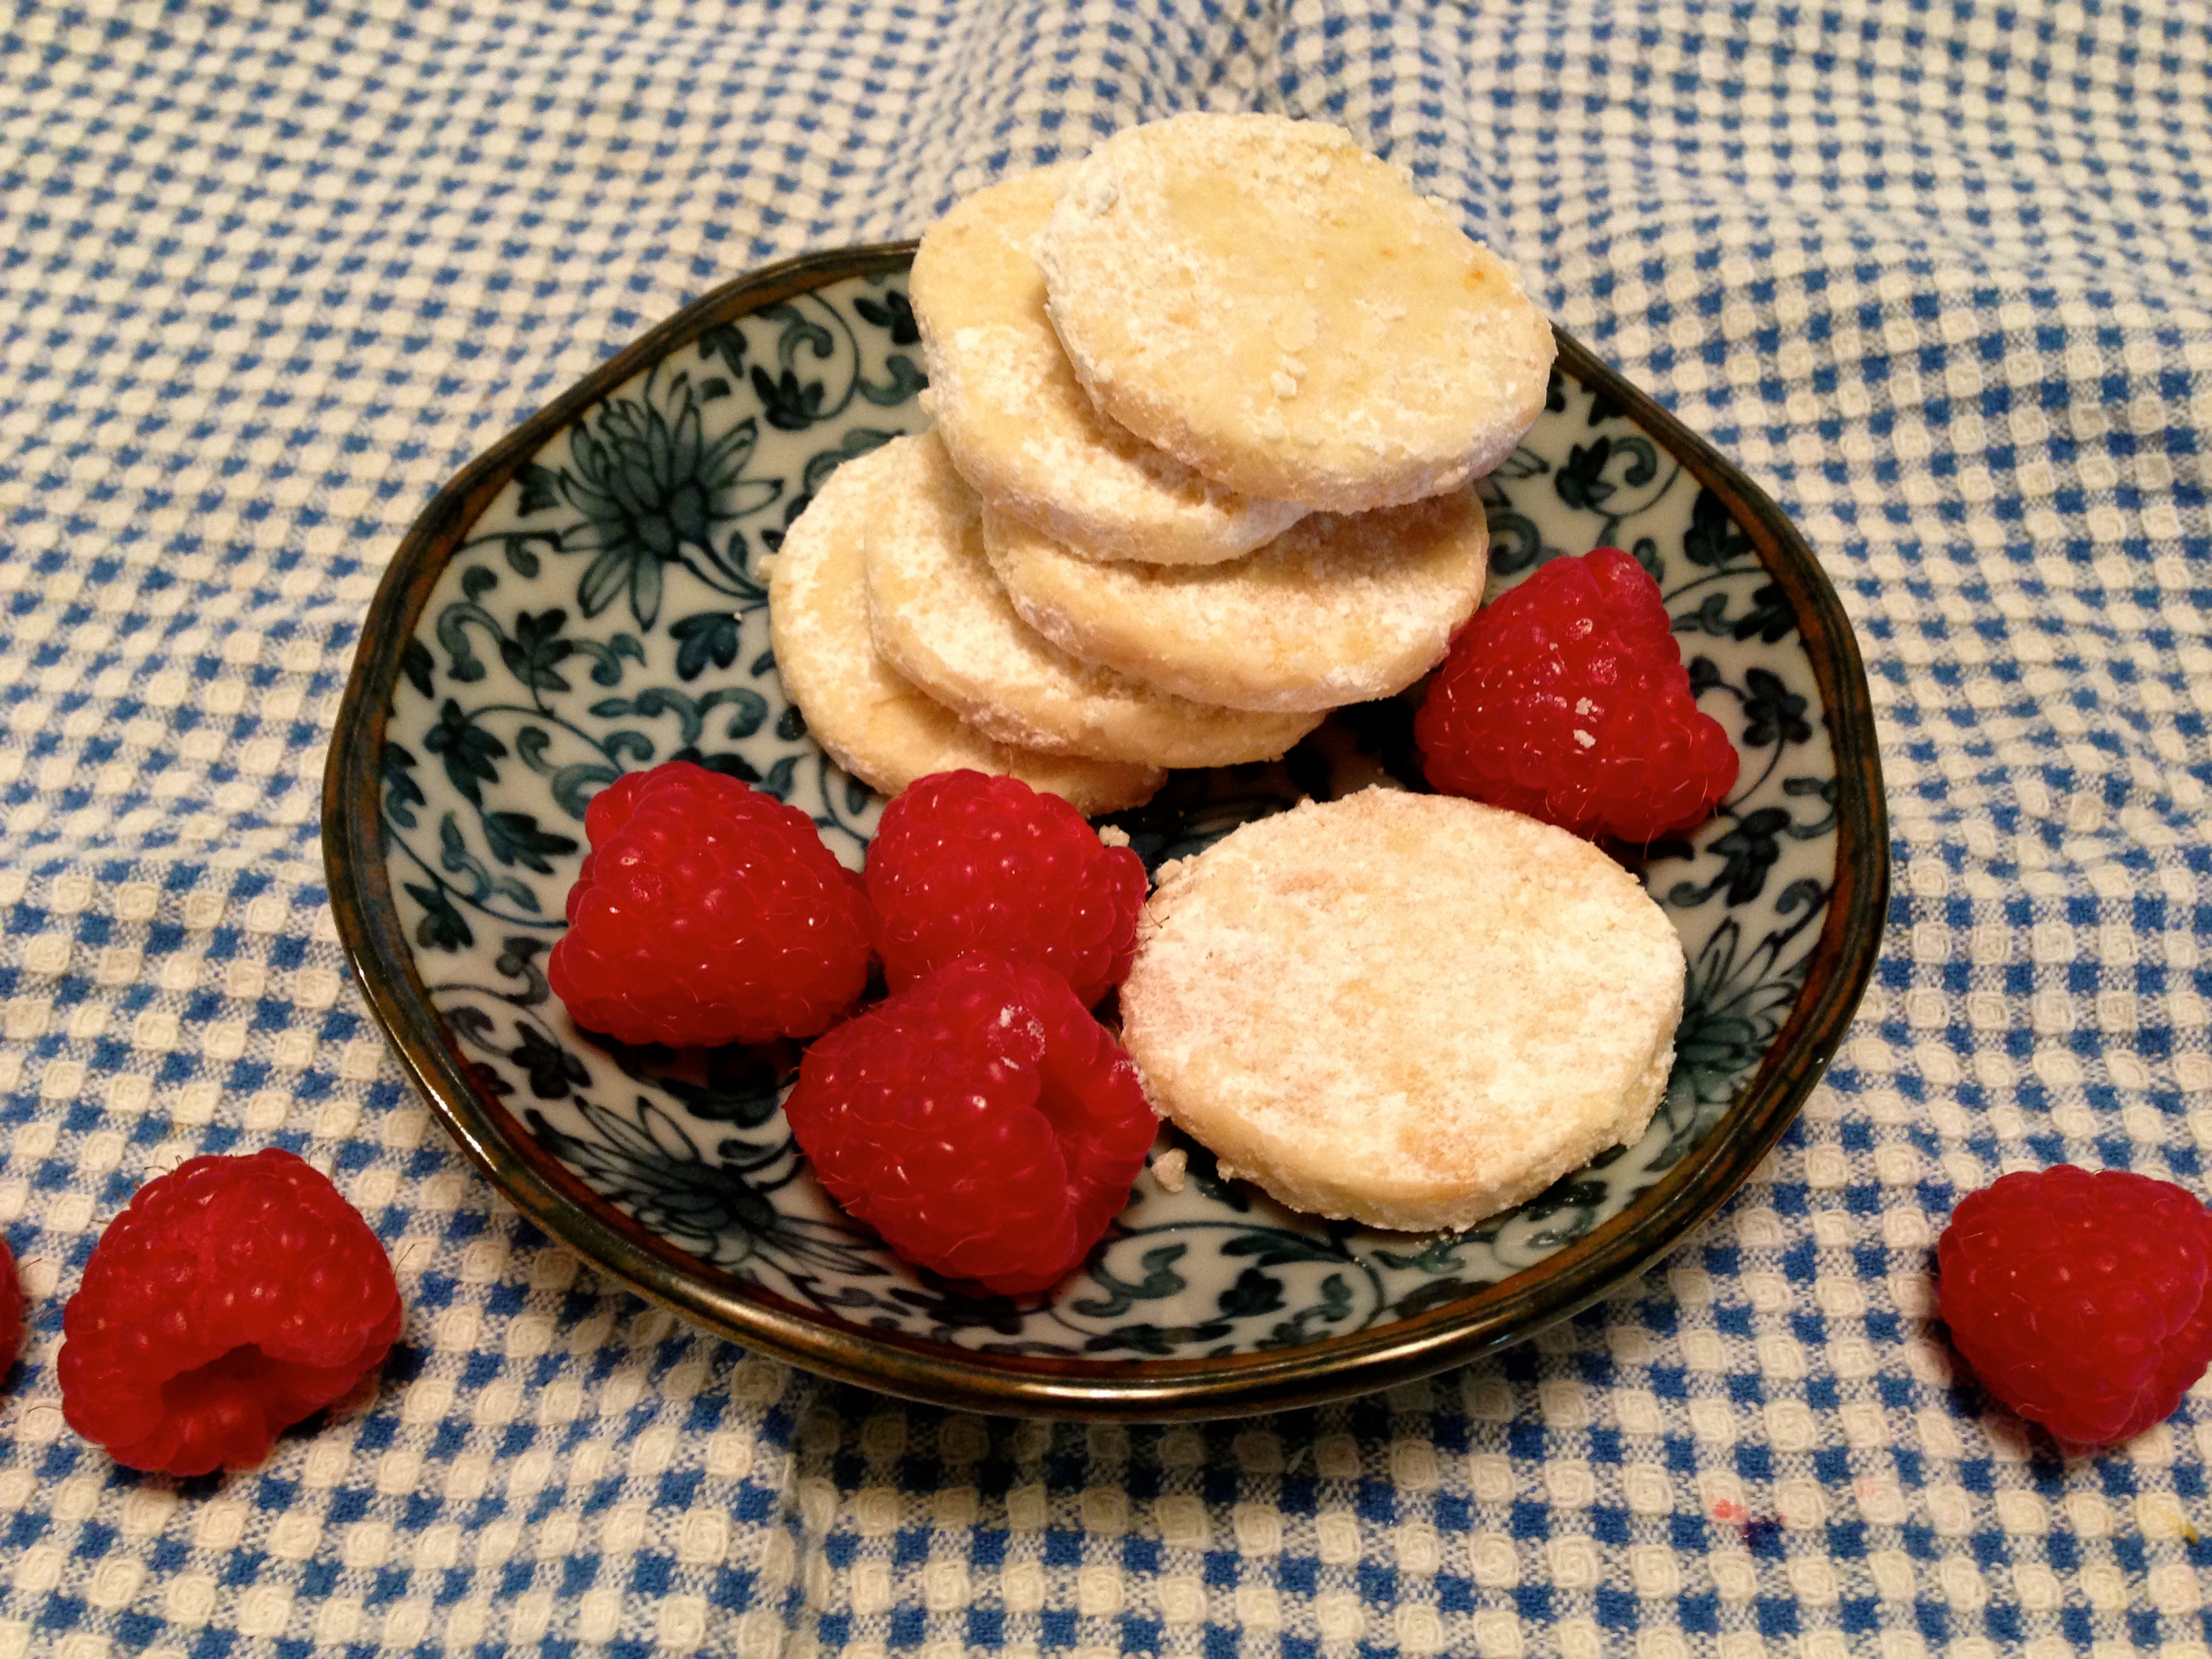
For those adults looking for a bright, lemon-y treat, however, these lemon shortbread cookies are just the thing!

IMG_3408Meyer Lemon Shortbread (recipe adapted from here)

Ingredients:

  • 2/3 cup (150g) unsalted butter, softened
  • 1/3 cup + 1 tablespoon (55g) confectioner’s sugar, sifted
  • ¼ cup (60ml) Meyer lemon juice
  • finely grated zest of 2 Meyer lemons
  • 1 teaspoon vanilla extract
  • 1 ¾ cups + 1 tablespoon (255g) all purpose flour, sifted
  • 2 tablespoons corn starch, sifted
  • 2/3 cup (94g) additional confectioner’s sugar, sifted

Instructions:

  1. Place the butter and icing sugar in the bowl of an electric mixer and beat for 8 minutes or until pale and creamy.
  2. Add the lemon juice, zest and vanilla and beat until combined.
  3. Add the flour and corn starch and beat just until a smooth dough forms.
  4. Turn dough onto a lightly floured surface and divide in half.
  5. Place each half onto a large piece of parchment paper and form into a 20cm (8in) long log. Wrap well in the paper and refrigerate for 1 ½ hours or until firm.
  6. Preheat the oven to 180°C/350°F. Line two large baking sheets with parchment paper.
  7. Unwrap one of the dough logs (keep the other in the fridge) and slice it into 1cm-thick rounds.
  8. Place onto the prepared baking sheets 5cm (2in) apart and bake for 15-18 minutes or until light golden.
  9. Remove from the oven and cool in the sheets for 5 minutes.
  10. Gently toss the warm shortbreads in the extra icing sugar and allow to cool completely on wire racks.

And for those who haven’t quite let go of their inner child (::raises hand::), here is a recipe for super easy sugar cookies that look wonderful (and taste great!) when cut into playful spring shapes and decorated for Easter:

IMG_3445
Sugar Cookies
 
(recipe modified from Alton Brown’s recipe)

Ingredients:

  • 3 cups all-purpose flour
  • 1 1/2 teaspoons baking powder
  • 1/4 teaspoon salt
  • 1 cup unsalted butter, softened
  • 1 cup sugar
  • 1 egg, beaten
  • 1 tsp vanilla
  • 1/2 tsp almond extract
  • Powdered sugar, for rolling out dough

Instructions:

  1. Sift together flour, baking powder, and salt. Set aside.
  2. Cream together butter and sugar until light in color.
  3. Add vanilla and almond extracts and egg.  Beat to combine.
  4. Gradually add flour, beating just until the mixture pulls away from the side of the bowl.  If it seems too stiff, wet hands, turn out the dough and finish kneading by hand.
  5. Divide the dough into portions, wrap in waxed paper or parchment, and refrigerate for 2 hours.
  6. Preheat oven to 350 degrees F.
  7. Sprinkle surface where you will roll out dough with powdered sugar.
  8. Remove 1 wrapped pack of dough from refrigerator at a time, sprinkle rolling pin with powdered sugar, and roll out dough to 1/4-inch thick.  Move the dough around and check underneath frequently to make sure it is not sticking.
  9. Cut into desired shape, place at least 1-inch apart on parchment paper or silicone baking mat, and bake for 6-8 minutes or until cookies are just beginning to turn brown around the edges, rotating cookie sheet halfway through baking time.
  10. Let sit on baking sheet for 2 minutes after removal from oven and then move to complete cooling on wire rack.
  11. Serve as is or ice as desired. Store in airtight container for up to 1 week.
Advertisement

Chasing away the Monday blues…

with Blueberry Meyer Lemon scones didn’t really work today, but at least the day started (and ended, because yes, it was one of those days) on a sweet, citrus-y and flowery note. I could go on and on about Meyer lemons, but I won’t – suffice it to say that when I spotted them all the way in NYC, it reminded me of how far I was from home and how much I missed California produce.  Now that I’m back, I have access to J’s mother’s tree, which is truly the tree that keeps on giving…Meyer lemons in abundance!  And the largest, most beautiful ones I’ve seen as well!  IMG_3391

Blueberry Meyer Lemon Scones (recipe adapted from here)

Ingredients:

  • 1 1/2 cups all purpose flour
  • 2 1/4 tsp baking powder
  • 1/4 tsp kosher salt
  • 1/4 cup plus 3/4 tablespoon sugar
  • 6 tbl (3/4 stick) chilled unsalted butter, cut into 1/2-inch cubes
  • 3/4 cups blueberries
  • 1/2 cup plus 1/2 tablespoon buttermilk
  • 1-2 tbl Meyer lemon juice
  • 1 1/2 tablespoons finely grated Meyer lemon peel

Ingredients:

  1. Position rack in top third of oven and preheat to 425°F.
  2. Line large baking sheet with parchment paper.
  3. Whisk flour, baking powder, salt and 1/4 cup sugar in large bowl. Using fingertips, rub in chilled butter until pieces are size of small peas.
  4. Mix 1/2 cup buttermilk, Meyer lemon juice, and finely grated Meyer lemon peel in glass measuring cup.
  5. Pour buttermilk mixture into dry ingredients and stir until dough begins to form (some of flour will not be incorporated).
  6. Transfer dough to lightly floured work surface and gather together. Fold in blueberries and knead dough briefly, about 5 turns.
  7. Form each dough into ball and flatten into 1-inch-thick disk. Cut each disk into 6 wedges or cut with biscuit cutter into desired shape.
  8. Transfer scones to prepared baking sheet, spacing 1 inch apart.
  9. Brush tops with remaining 1/2 tablespoon buttermilk and sprinkle with remaining 3/4 tablespoon sugar.
  10. Bake until scones are golden brown on top and toothpick inserted into center comes out clean, about 15-20 minutes.

Goodbye winter, hellooooo spring!

And what a beautiful spring it already is in sunny California!  My friends back East have been treated to another dusting of snow, but here on the West Coast the weather has been warm and the streets have been lined with flowering trees.  It is one of my favorite times of the year.

I had some lovely pears left in my refrigerator, which I accidentally let ripen too much in the midst of a hectic work schedule.  Since I like my fruit crisp and at its peak (not soft), I decided to turn the pears into this lovely Italian pear cake – it was my way of saying adieu to winter and its warm, spice-filled dishes.  This cake is surprisingly light and fluffy thanks to the corn starch, and lightly sweetened.  I added a little cinnamon for a little extra warmth.

IMG_3374 IMG_3379Italian Pear Cake (original recipe here)

Ingredients:

  • 3 ‘very’ ripe small pears (or 2 large ones) – peeled & cut into chunks
  • 1 & 1/4 cup all purpose flour, sifted
  • 3/4 cup granulated sugar
  • 1 tbsp baking powder
  • 1/4 cup corn flour (corn starch)
  • 1/2 tsp cinnamon (optional)
  • 1 pinch salt
  • 1/3 cup + 1 tbsp butter (slightly melted)
  • 3 eggs
  • confectioner’s sugar (to sprinkle/ decorate on cake)

Instructions:

  1. Pre-heat the oven to 350°F.
  2. Cream the eggs and sugar until light and fluffy.
  3. Sift the flour, corn starch, cinnamon (if using), salt, and baking powder together.
  4. Add the flour mix and stir well, add the butter till the batter is smooth.
  5. Lightly grease and then line a 9-inch (23 cm) springform cake pan with parchment paper, and pour in the batter.
  6. Peel the the pears, cut in chunks and drop them on the cake, gently pushing down each piece of pear. It doesn’t matter if the pear sticks out of the cake it will all blend in.
  7. Bake for 25-30 minutes, or until a toothpick comes out clean – do not overtake! Leave to cool before serving.
  8. When cool, dust with confectioner’s sugar.
  9. (Optional) Serve with whipped cream.

On sweet revenge…

It’s been a busy week, with a few more downs than ups after a fun-filled birthday weekend.  I’ve started developing a little carpal tunnel syndrome from all the chart documentation I’ve been doing since I started working.  The EMR is both a blessing and a curse.  I spend more time in from of a computer than I do with my patients, and no, that is *not* why I went into medicine.

That said, it’s been a full week, too.  March is a month full of joyful birthdays!  One of my closest childhood friends has her birthday on St. Patrick’s day, so her birthday is always doubly lucky and green ;).  I dug out the green shirt and made a vibrant green salad to celebrate the day, even though I couldn’t join her for a green beer!

IMG_3361Green Salad with Cilantro-Lemon Vinaigrette (inspired by this recipe)

Ingredients:

For the dressing (makes extra, so save for another salad!):

  • 6 tablespoons extra-virgin olive oil
  • 3 tablespoons freshly squeezed lemon juice
  • 1 small shallot, coarsely chopped
  • 1/4 cup cilantro leaves
  • 1 tsp honey
  • Kosher salt and freshly ground pepper

For the salad:

  • 2 cups arugula
  • 1/2 avocado, cut into thin wedges
  • 2 tbl shelled salted pistachios
  • 8-10 (about 1/2 lb) spears fresh spring asparagus
  • 1/4 cup cilantro leaves
  • shaved parmesan (optional)

Instructions:

  1. In a blender, blend the oil, lemon juice, shallot, honey, and 1/4 cup of the cilantro. Season the dressing with salt and pepper.
  2. Bring a saucepan of salted water to a boil. Fill a bowl with ice water. Cut off 1 inch of the asparagus tips and cut stalks into 2 inch segments.  (If using larger asparagus, cut off 1 inch of the asparagus and cut each tip in half lengthwise. Using a peeler or mandoline, shave the asparagus spears lengthwise.) Blanch the asparagus tips and segments (or strands) in the boiling water until just heated through, 10 seconds. Drain and transfer to the ice water to chill; drain well. Pat dry and transfer to a bowl.
  3. Add the arugula, pistachios and the remaining 1/4 cup of cilantro leaves to the asparagus.  Toss with a little dressing.  Add avocado and parmesan (if using) and drizzle with dressing as desired.  Enjoy!

And as a reward for a looooonnnnggg and tiring week, what better way to forget the week’s worries by indulging in a bowl of chocolate-y goodness?  Which, surprisingly, isn’t all that unhealthy for you, packed w/ fiber, antioxidants, and omega-3s?  Oh, sweet revenge!

Mexican Chocolate Chia Pudding with Strawberries IMG_3373

Ingredients:

  • ¼ cup chia seed
  • 1 cup unsweetened vanilla almond milk (or milk of choice)
  • 5 to 6 medjool dates, seeds removed**
  • 2 to 3 tablespoons cocoa powder (depends on the intensity of the cocoa powder)
  • 1/2 teaspoon vanilla extract (use 1 tsp if using unflavored almond milk)
  • 1/2 to 1 teaspoon cinnamon (depends on how spicy you like your chocolate!)
  • pinch of sea salt

Instructions:

**You need a high-powered blender such as a Vitamix**

  1. Put chia seed in bottom of blender and add almond milk and dates.  Allow chia seed to soak up milk and become gelatinous, at least 60 minutes, but you could also soak it for longer.
  2. Add cocoa powder, cinnamon, vanilla, and salt and blend at high speed until very, very smooth.
  3. Spoon into serving dishes/bowls and refrigerate until set.  Garnish with shaved chocolate and strawberries and enjoy!

** instead of dates, you can also simply use the sweetener of your choice – a little honey or agave syrup would work well!

It’s matcha time!

A double rainbow to greet the day :)
A double rainbow to greet the day 🙂

I have always loved tea.  Growing up, one of my favorite memories was having tea with my sisters and dad when he came home bearing gifts of sweets from his clients, usually around Autumn Moon festival (mooncakes!), Lunar New Year, or Christmas.  It was a little tradition we had, to gather around a pot of tea with him and share the sweets.  To this day, I can not have sweets without a freshly brewed pot of tea.  It is my warm, comforting beverage of choice, and I could sip on it all day long.

Matcha is the only form of tea in which the entire leaf is consumed.  The tea leaves are carefully tended in shade just prior to the harvest, so that the leaves are more delicate and flavorful.  They are then hand picked and carefully steamed, dried, and then stone-ground into the finest powder.   The Japanese tea ritual revolves around the making and tasting of matcha, ceremoniously highlighting its nuanced flavors and delicacy.

In addition to its sweet, vegetal flavor, matcha is loaded with antioxidants and vitamins.  Various studies have tried to link its high catechin polyphenol content to decreased risk of certain types of cancer, lower cholesterol, improved metabolism, and improved cardiovascular health.

I indulged and used matcha to make these lovely, light Matcha Tea Cake cookies for a friend’s baby shower.  With a cup of tea, they make the perfect light treat for a quiet afternoon.  J has decided to dub these “Shrek cookies” because of their color, even though I think they are a pretty shade of green.  :-/

IMG_3319

Matcha Tea Cake cookies (makes 2 dozen), recipe from Food and Wine

Ingredients:

  • 2 cups all-purpose flour
  • 2 teaspoons baking powder
  • 1/2 teaspoon kosher salt
  • 1/8 teaspoon ground cardamom (or cinnamon)
  • 3/4 cup granulated sugar
  • 2/3 cup canola oil
  • 2 large eggs
  • 1/2 teaspoon pure vanilla extract
  • 1/4 teaspoon pure almond extract
  • 2 tablespoons plus 1 teaspoon matcha tea powder
  • 1/4 cup confectioners’ sugar

Instructions:

  1. In a medium bowl, whisk the flour, baking powder, salt and cardamom. In another bowl, whisk the granulated sugar, oil, eggs and vanilla and almond extracts. In a small bowl, stir 2 tablespoons of the matcha powder with 2 tablespoons of water, then stir into the wet ingredients. Stir the wet ingredients into the flour mixture just until combined.
  2. Using a 1-ounce ice cream scoop or 2 tablespoons, scoop 1-inch balls of dough at least 
2 inches apart onto 2 baking sheets lined with parchment paper. Refrigerate for at least 20 minutes.IMG_3312
  3. Preheat the oven to 350°. Bake the cookies for about 
10 minutes, until set at the edges and very lightly browned on the bottoms. Let the cookies cool for 10 minutes, then transfer to a rack to cool completely.
  4. Arrange the cookies on 1 baking sheet. In a sieve, combine the confectioners’ sugar with the remaining 1 teaspoon of matcha. Dust over the cookies and serve.IMG_3315
MAKE AHEAD The cookies can be stored in an airtight container for up to 3 days. Dust with the matcha sugar before serving.

Little orbs of good fortune

Lunar new year celebrations are full of traditions that have their origins in wishes for happiness, prosperity, and health in the coming year.  My mother even tells the story that my grandfather knew my father was ‘the one’ for her when he came by to send her family New Year’s greetings and the hoa mai tree bloomed on that very day.

Growing up, my parents liked to decorate the house with freshly cut flowers to symbolize spring.  They also always had a pretty pile of oranges and/or pomelos on display, a nod to their association with prosperity.  “Cau vua du xai,” which  translates to “wishes for prosperity that meets and exceeds your needs,” is often used as a play on words to determine the fruits displayed: cau (mang cauor soursop), vua (dua, or coconut), du (du du, or papaya), and xai (xoai, or mango).  Families will often have those specific fruits or other fruits depending on their geographic origins.

Needless to say, I have loved all the citrus that is currently in season, and now aptly available for the holiday: blood oranges, cara cara oranges, meyer lemons, and…kumquats!  They are different from other citrus because the sweetness lies in the peel, while the pulp and juice are actually quite tart.  Eaten whole, these delightful little orbs are an eye-popping burst of sweet-tart flavor.  People often gift kumquat trees during the new year, with the thought that the more abundant the kumquats, the more luck and prosperity will come to your family.

Fortune aside, I have been having fun experimenting with them in my kitchen.  It’s been a busy weekend of traveling to see friends, but just before I left, I made a spiced kumquat compote and spiced kumquat and almond tea cakes.  Enjoy!

IMG_3261

Spiced Kumquat Compote (makes about 1 cup)

Ingredients:

  • 1 cup thinly sliced kumquats, seeds removed (about 8 oz)
  • 3/4 cup honey
  • 1 cup water
  • 1 cinnamon stick
  • 1 star anise
  • 1/2 tsp grated ginger

Instructions:

  1. Thinly slice kumquats transversely into rings and remove seeds.
  2. Put water and honey in heavy saucepan over medium heat, stirring to dissolve the honey.
  3. Add kumquats, cinnamon stick, ginger, and star anise to the water and honey.  IMG_3256
  4. Simmer uncovered (think gentle bubbling) for about 30-35 minutes, until the mixture thickens.
  5. Remove from heat, discard cinnamon and anise, and store in sterilized jam/marmalade jar.

Enjoy the warmly spiced, citrusy compote on bread, muffins, with cheese and crackers, or in the following tea cakes!

IMG_3305

Spiced Kumquat and Almond Tea Cakes (makes ~12, inspired by Tartelette)

Ingredients:

  • 1/2 cup (70 grams) all-purpose flour
  • 1 teaspoon baking powder
  • pinch of salt
  • 1 stick (113 grams) unsalted butter at room temperature
  • 1 1/4 cup (150 grams) powdered sugar, unsifted
  • 4 medium eggs
  • 1/2 tsp vanilla
  • 1 cup (100 grams) ground almonds
  • 1/2 cup spiced kumquat compote (recipe above)

Instructions:

  1. Sift together flour, baking powder, and salt.  Set aside.
  2. Butter 12-sized muffin pan or baking tins (your preference).
  3. Preheat oven to 350 degrees F.
  4. Cream together butter and powdered sugar using an electric mixer.
  5. Add vanilla and then the eggs one at a time, beating well after each addition.
  6. Add flour and ground almonds, mixing another 30 seconds.
  7. Fold in the spiced kumquat compote.
  8. Divide the batter into prepared tins, top with either fresh or poached kumquat slices and bake for 10-15 minutes until golden brown (baking time may vary depending on cake tin size).

An easy puff of bliss

IMG_3106 IMG_3108

I decided to surprise J with this quick and easy (but delightfully indulgent!) dutch apple pancake this morning.  It’s based on David Eyre‘s pancake from The Essential New York Times Cookbook and is cross between a pancake and crepe, sweet and tart with crispy edges and a moist center.  Similar recipes have referred to this delicious baked pancake as Dutch baby pancakes, German pancakes, or Dutch puffs.  Regardless of what they are named, they make for an easy and impressive breakfast or brunch treat!

They are traditionally served with lemon juice and powdered sugar.  I added thinly  sliced Honey Crisp apples to mine.

Apple Dutch Baby (serves 2-4)

Ingredients:

1/3 cup all purpose flour

1/2 cup milk

2 eggs, lightly beaten

1/4 tsp cinnamon

4 tbl unsalted butter

1/2 small apple, thinly sliced (about 1/4-inch slices or thinner)

2 tbl powdered (confectioners’) sugar

juice of 1/2 lemon (I used a Meyer lemon)

Instructions:

  1. Heat oven to 425 degrees. Combine the flour, milk, eggs, and cinnamon in a bowl. Beat lightly. Leave the batter a little lumpy.
  2. Melt the butter in a 10-inch skillet with a heatproof handle (cast iron would work very well for this) over medium heat.  Add apple slices and cook for 3-5 minutes, until slightly softened.
  3. Pour in the batter and carefully place in heated oven.  Bake for 15 to 20 minutes, until the pancake is puffed and golden brown.
  4. Sprinkle with the sugar and return briefly to the oven for about 1-2 minutes.
  5. Sprinkle with lemon juice and serve warm, with additional fruit as desired.

When life makes you bananas…make banana bread!

A view from my morning run:
IMG_2919
Every runner remembers their first real run – the exhilarating moment when you realize how far you are really able to go, and when you realize how addicting it is to feel the pavement under your feet, the wind in your hair, and the rhythm  of your breathing as the miles melt away.  You’re already thinking about your next run by the time you’re done.

These days, after injuring my hip a few years ago, every run feels like a gift.  I don’t get caught up in races or PRs or comparing distances and times because I would risk  injury and possibly not be able to run for many more years, which is precisely what I hope to do.  Instead, I’ve learned to listen to my body and enjoy the fact that I was simply “born to run,” as Christopher McDougall’s novel is aptly titled.  I am now a better, faster, and lighter runner than I have ever been!

I run when I’m happy, when I’m sad, and when I’m stressed.  In all my moods, even when I didn’t initially feel like running, I finish my run with a load off my mind and heart.

Perhaps that’s why the boyfriend asked, “Hon, what’s on your mind?” the moment I recapped my day and told him I had run and baked.

People who know me know that I bake when I have a lot on my mind.  It’s a bit of an escape, to soothe my mind by using my hands to measure, weigh, mix … a little bit of this, a little bit of that.  And before you know it, the house smells incredible and you have something to share with any willing taster! But I also bake when I’m happy, when I have time, when I have the ingredients, and when I’m taken with a recipe and can’t stop thinking about it for days.

He needn’t have worried quite  that much.
IMG_3022 If you have too many bananas around (it happens!), this recipe for Nutella Banana Bread from Cooking Light comes together quickly and is a crowd-pleaser – I work in an office full of nutritionists, and not a crumb remained! You CAN be healthy and indulge (a little). The bananas provide fiber and potassium and make the bread naturally moist and sweet, requiring less fat and sugar overall.  I wouldn’t change a thing about this recipe, although I don’t usually do the chocolate drizzle/nut garnish.

Chocolate-Hazelnut Banana Bread

Yield: Serves 16 (serving size: 1 slice)

Ingredients:

5 tablespoons chocolate-hazelnut spread (such as Nutella)
3 tablespoons plus
1 teaspoon canola oil, divided
3 tablespoons butter, softened
1/2 cup packed brown sugar
2 medium ripe bananas, sliced
2 large eggs
6.75 ounces all-purpose flour (about 1 1/2 cups)
3/4 teaspoon baking soda
1/2 teaspoon baking powder
1/2 teaspoon salt
2/3 cup whole buttermilk
Baking spray with flour (such as Baker’s Joy)
1/4 cup hazelnuts, coarsely chopped 1 ounce bittersweet chocolate, finely chopped

Directions:
1. Preheat oven to 350°.
2. Combine chocolate-hazelnut spread and 1 teaspoon oil in a microwave-safe dish; microwave at HIGH for 30 seconds or until melted. Stir. Combine 3 tablespoons oil, butter, brown sugar, and banana in a large bowl; beat with a mixer at medium-high speed until well blended. Add eggs, 1 at a time, beating well after each addition.
3. Weigh or lightly spoon flour into dry measuring cups; level with a knife. Combine flour, baking soda, baking powder, and salt. Beating at low speed, add flour mixture and buttermilk alternately to banana mixture, beginning and ending with flour mixture; beat just until combined. Scrape half of batter into a 9 x 5-inch metal loaf pan coated with baking spray, and top with chocolate-hazelnut spread mixture. Spread remaining batter over chocolate mixture. Using a wooden pick, swirl batter. Sprinkle batter with hazelnuts.
4. Bake at 350° for 55 minutes or until a wooden pick comes out with moist crumbs clinging. Cool 10 minutes in pan on a wire rack. Remove bread; cool on wire rack.
5. Place bittersweet chocolate in a microwave-safe dish; microwave at high for 30 seconds. Drizzle bread with chocolate; let stand until set.

Nutrition data: Calories: 193 Fat: 9.7g Saturated fat: 3g Monounsaturated fat: 3.5g Polyunsaturated fat: 1.2g Protein: 3.4g Carbohydrate: 24.6g Fiber: 1.2g Cholesterol: 30mg Iron: 1mg Sodium: 186mg Calcium: 28mg

Another great option for breakfast on the run (and too many bananas) are these whole wheat banana muffins:

Whole Wheat Banana Muffins (adapted from here):
Ingredients:

  • 1½ cups whole-wheat flour (I used whole white wheat flour)
  • ¾ teaspoon baking soda
  • ½ teaspoon salt
  • ¼ teaspoon baking powder
  • 1/2 tsp cinnamon
  • 2 eggs
  • 1/4 cup (1/2 stick) butter, melted and cooled
  • 1/4 cup canola oil
  • 2 tbl of milk
  • ⅓ cup pure maple syrup
  • 2 very ripe bananas, peeled (the riper they are the sweeter they’ll be)

Directions:

  1. Preheat the oven to 350 degrees F.
  2. Line a muffin pan with paper or silicone liners and set aside.
  3. In a small bowl mash the two bananas together with the back of a fork.
  4. In a large bowl whisk together the flour, baking soda, salt, cinnamon, and baking powder.
  5. Add eggs, butter, canola oil, milk, and syrup to the dry ingredients and mix until just blended.
  6. Fold in mashed bananas.
  7. Divide batter carefully between the prepared muffin tins.
  8. Bake until they begin to brown on top and a toothpick comes clean when inserted in the center, about 20 to 22 minutes.

photo

When without, improvise…

Looking back at the Boxcar Children series, I’m surprised at how naively I enjoyed reading the adventures of four kids solving mysteries in a bygone era, ignoring the improbable circumstances.  While the stories seem much more dated and naive now, perhaps what appealed to me was reading about how the oldest sister was always somehow cooking something that sounded both foreign and yet appetizing to me, as a first-generation kid.

Today, I thought of Jessie rolling out apple pie crust with an old green bottle as I improvised in my own kitchen to roll out the crust for these lovely “rose apple tarts.”  Lacking a rolling pin in my temporary kitchen, I put a nearly empty bottle of lackluster French wine to better use…

Voila!  “Rose apple tarts!”  I’ve been enchanted with this idea since seeing the recipes posted earlier in the fall.  I used honey crisp apples thinly sliced with a mandolin to form the roses, and encased the “apple roses” in an almond tart crust. IMG_3061

Rose Apple Tarts (recipe adapted from here and here):

Ingredients
for the pastry dough
  • 1  cup all-purpose flour
  • 1/4 cup whole white wheat flour
  • 1/2 cup slivered blanched almonds (about 2 ounces) OR almond meal
  • 1/4 cup sugar
  • 1/4 teaspoon salt
  • 1/2 cup (1 stick) chilled unsalted butter, cut into pieces
  • 3/4 teaspoon almond extract
  • 2-3 tablespoons (about) ice water

for the filling

  • 2-3 apples (Pink Lady, Braeburn, Honeycrisp etc)
  • 1/2 cup brown sugar
  • 4 tbsp (1/2 stick) unsalted butter
  • juice of 1 lemon (about 3 tbl) – I used a Meyer lemon
  • 1/4 cup strawberry preserves

Instructions:

for the pastry dough

  1. Blend flour, almonds, sugar and salt in processor until nuts are finely ground. (If using almond meal, pulse together dry ingredients).
  2. Add butter and cut in using on/off turns until mixture resembles coarse meal.* Mix in almond extract and enough water to form moist clumps
  3. Knead dough briefly on work surface to combine; flatten into disk. Wrap in plastic and refrigerate until firm before rolling, at least 2 hours and up to 1 day.
  4. On a well floured surface, roll out the dough to 1/4″ thick. Use a biscuit cutter, a cup, or a bowl about 3 1/2-4″ in diameter to cut out rounds of dough.
  5. Fit each round into the cup of a buttered muffin tin, pushing the dough up the sides. Prick bottom of the dough with a fork.  Chill dough while the filling is prepped.

for the filling

  1. Preheat oven to 375F.
  2. To cut the apples and remove the core, place the apple upright and make straight cuts around the core to divide the apple into four pieces: 2 large pieces and 2 smaller pieces in addition to the square core.
  3. Using a mandolin or a very sharp knife, cut the apples very thinly into half moons. Toss the apples with the lemon juice. Melt 2 tbsp of butter and combine with 1/4 cup of brown sugar. Pour mixture over the apples along with lemon juice and toss to combine. Microwave apples for about 1 minute, until soft and pliable enough to roll.
  4. Melt the remaining 2 tbsp of butter and combine with remaining 1/4 cup of brown sugar. Brush the bottom of each dough cup with the mixture.
  5. To form the roses, place about 10 slices of apples on a flat surface, laying them out horizontally and consistently with the skin side facing you. Place each slice so it overlaps the previous slice by half. Begin tightly rolling the apples from one end to the other. Once you’ve got the basic rose shape, pick up the apples and add any additional apple “petals” around the outside, depending on how large you want the rose to be.
  6. Put an apple rose in each cup of the muffin tin and bake for 25-30 minutes at 375F until crust is golden and apples are cooked through.
  7. Warm the strawberry preserves in the microwave for about 30 seconds. Brush preserves over each apple rose to glaze.

* Alternatively, you can whisk together the dry ingredients and then work the butter into the flour using a pastry cutter, two knives, or your fingertips until the mixture looks like a coarse meal and there are no pieces of butter larger than the size of a pea.