How do you like your crab cakes?

Apparently, I favor my crab cakes more crab-by with little filler, while J prefers his not quite as dense with crab.  I guess it’s too filling to have less filler, and he’d rather be able to eat more crab cakes!

We have both spent a good amount of time back East, and we both remember gathering with friends to devour bushels of Maryland blue crab smothered in the ubiquitous Old Bay seasoning.  I’m pretty sure the salt content in that rub would send more than several of my patients’ blood pressure through the roof, but in moderation it is very tasty indeed!   Learning to pry open crabs with my fingers, drenching humidity, and the addictive spices in Old Bay seasoning are some of my vivid associations with summers in D.C.

I used a recipe from Cooking Light to make crab cake sliders the other night for dinner, and they were perfect with the warm weather we are having.  After a run along the beach and soaking in the sunshine, these little sliders reminded us that spring break and summer fun are not that far away.  J enjoyed his with a cool, refreshing beer.  I enjoyed mine with extra dill sauce ;).

IMG_3356

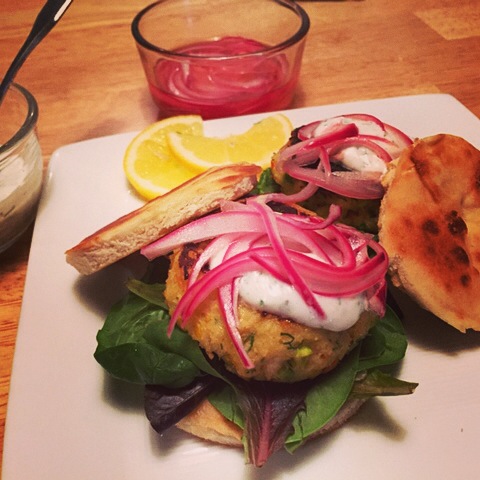
Crab Cake Sliders with Yogurt Dill Sauce (recipe adapted from here)

Ingredients:

  • 8 whole-wheat slider buns
  • 1/4 cup rice vinegar
  • 1 tablespoon sugar
  • 1 tablespoon lemon juice (I used Meyer lemon)
  • 1/2 cup thinly vertically sliced red onion
  • 6 tablespoons plain fat-free Greek yogurt, divided
  • 2 tablespoon chopped fresh dill, divided
  • 3/4 cup finely chopped red bell pepper
  • 1/4 teaspoon black pepper
  • 1/4 teaspoon kosher salt, or to taste
  • 2 green onions, chopped
  • 1 large egg, lightly beaten
  • 1 large egg yolk, lightly beaten
  • 2/3 cup whole-wheat panko
  • 8 ounces lump crabmeat, drained and shell pieces removed
  • 4 teaspoons canola oil
  • 1 1/2 cups baby arugula or mixed baby greens

Instructions:

1. Preheat broiler to high. Hollow out buns, leaving a 1/2-inch-thick shell. Arrange buns in a single layer on a baking sheet. Broil 1 1/2 minutes on each side or until lightly toasted. **

2. Place 1/4 cup vinegar and sugar in a microwave-safe bowl. Microwave at HIGH for 45 seconds. Stir in red onion. Let stand 15 minutes. Drain.

3. Combine  1 tablespoon lemon juice, 3 tablespoons yogurt, and  1 tablespoon dill in a small bowl.  Season with salt and pepper to taste.

4. Combine remaining 3 tablespoons yogurt, 1 tablespoon dill, bell pepper, and next 5 ingredients (through yolk). Add panko and crab, stirring to combine. Working with damp hands, divide crab mixture into 8 equal portions, shaping each into a 3/4-inch-thick patty.

5. Heat a large nonstick skillet over medium-high heat. Add oil to pan; swirl to coat. Add crab cakes to pan; cook 4 minutes on each side or until golden and thoroughly heated.

6. Spread 1 teaspoon yogurt mixture on bottom half of each bun. Top with 1 patty. Divide onions and arugula among sliders. Top with top halves of buns.

**J wanted to use fluffier bread for the crab cakes, so we used a cookie cutter to cut rounds from garlic naan bread, which we then pan-toasted until lightly crispy on the outside to use in lieu of hamburger buns.  

Advertisement

Let it be, let it be…

Since I have no formal culinary training and learned to cook by reading cookbooks or by watching and talking to my mother and grandmother, I have had to painfully work my way through many mistakes.  And I’m still learning!  There always seems to be some new ingredient, technique, or flavor profile to learn and explore.  I love making the kitchen my lifelong science experiment.

That said, one of the earlier lessons I had to learn was how to ‘let it be’ and let a protein properly sear.  Less is more.  So here’s to less poking, prodding, and moving around, in order to allow for a proper maillard reaction and the tasty results that ensue!  The seared protein will release on its own from a well-heated pan once it’s ready to be flipped.

For a quick weeknight dinner the other night, I made Seared Scallops with Avocado and Watermelon Radishes, inspired by this gorgeous recipe from Epicurious.

IMG_3214

Seared Scallops with Avocado and Watermelon Radish

Ingredients:

  • 3-4 small watermelon radishes, very thinly sliced on a mandoline
  • 1 tablespoon white wine vinegar or white balsamic vinegar
  • 1 tablespoon yuzu juice
  • Kosher salt
  • 8 sea scallops (about 1 pound), side muscles removed
  • 1 tablespoon olive oil, plus more for drizzling
  • 1 avocado, very thinly sliced
  • 1 tablespoon fresh lemon juice
  • 1/2 teaspoon finely grated grapefruit zest
  • 1 tablespoon fresh grapefruit juice
  • a few sprigs of cilantro, as garnish

Instructions:

  1. Toss daikon, vinegar, and yuzu juice in a medium bowl; season with salt.  Set aside.
  2. Pat scallops dry and season scallops with salt. Heat 1 tablespoon oil in a large skillet over high heat until almost smoking. Add scallops and cook until seared and golden brown but still raw in the center, about 2 minutes per side; transfer to a plate. Let cool slightly, then slice each scallop crosswise into 2 rounds.
  3. Divide avocado among plates; drizzle with lemon juice and season with salt.
  4. Set scallops on avocado and drizzle grapefruit juice and oil over.  Top with grapefruit zest and season with salt to taste. Arrange reserved and drained watermelon radishes over and among the scallops.  Garnish with cilantro and serve immediately.

When life gives you kumquats…

…make a salad!  Doesn’t have quite the same ring to it as “when life gives you lemons, make lemonade,” but that is quite literally what I did the other day, instead of simply snacking on these delightful little fruits.

I love the orderly chaos that is the kitchen.  Unlike life’s chaos, there is a method to the madness:  all the chopping, slicing, dicing, sauteeing, simmering, roasting, and basting ultimately comes together to make a cohesive dish, with all its disparate components somehow harmonized.

For dinner the other night, I made a riff on Plenty More‘s Celery Salad with Feta and Soft-Boiled Egg, using instead my beloved kumquats.  So simple and satisfying.  And so therapeutic, to shift my focus to slicing everything as thinly and uniformly as I could.

IMG_3254

Celery Salad with Feta, Kumquats, and Soft-Boiled Egg (serves 2 as a light dinner or side salad)

Ingredients:

  • 4 celery stalks, thinly sliced on the diagonal
  • 1 green pepper, seeded and thinly sliced lengthwise into strips
  • 1/2 small red onion, thinly sliced
  • 1/2 tsp superfine sugar
  • ~10 kumquats (or as desired), thinly sliced into rings, with seeds removed
  • 1/3 cup celery leaves
  • 1/4 cup flat leaf parsley
  • 1/2 cup cilantro leaves
  • 2 tbl capers
  • 1 green chile, seeded and finely sliced
  • 1 tbl olive oil, plus extra to finish
  • 2 eggs
  • 1/2 cup (3.5 oz/100 gm) feta, crumbled into large chunks
  • salt
  • freshly ground pepper

Instructions:

  1. After slicing celery, green peppers, and onion thinly, place in a bowl, sprinkle with sugar and 1/4 tsp salt, and mix well.  Set aside for 30 minutes to allow the vegetables to soften and to draw out some of the juices, which will comprise part of the dressing.  IMG_3242
  2. Add the kumquats, celery leaves, parsley, cilantro, capers, chiles, and olive oil to the softened vegetables.  Mix gently to combine.  Season lightly with salt and pepper to taste.  IMG_3243
  3. Just before serving, carefully spoon eggs into a saucepan of boiling water and simmer gently for 6 minutes.  Run under cold water until the eggs are just cool enough to handle but still warm, then peel gently; the yolk should still be runny.
  4. Arrange the salad on individual plates, dot each with feta, and place a soft-boiled egg on top, broken in the middle.  Finish with a few drops of olive oil and freshly ground pepper and serve at once.

Miso…hungry!

Have you ever had days when the hours flash by so quickly that by the time you’ve stopped spinning and finally have the chance to catch your breath, you realize that you’ve been running on fumes and that you are now officially…HANGRY?  Considering that I do not have that many mouths to feed (yet), this worries me a little…how am I going to feed co-dependents not so keen on fumes for sustenance?

All silliness aside, I have slowly been working on my repertoire of quick meals, precisely for these HANGRY times.  It also helps to be less than 10 minutes from a decent grocery store with organic produce.  Even in NYC, I was among the few denizens who did not routinely order delivery, to the consternation of my roommates.

One of the items I always have in my pantry is miso.  Made from fermented soybeans, miso is chock full of protein, vitamins, and minerals and adds a salty, sweet, earthy, and savory dimension to sauces, marinades, and soups.  It lends itself well to both traditional and modern cooking, and is extremely versatile.  I used it to make a quick side dish to pair with my Pan-Seared Sake Sea Bass the other night, and it made one hangry MD much happier after a long day.

IMG_3219 IMG_3218

Miso Butter Glazed Mushrooms

Ingredients:

  • 1 tsp butter
  • 16 oz variety of mushrooms – wiped clean and sliced if larger (e.g. crimini, oyster, shiitake)
  • 2 scallions, thinly sliced with white and green parts divided
  • 1 tbl white (shiro) miso
  • 1/2 tbl water
  • 1 tsp sugar
  • 2 tsp sesame oil

Instructions:

  1. Heat well-seasoned wok over medium heat.
  2. Melt 1 tsp butter and stir-fry white scallion parts and mushrooms, allowing some time between stirs for the mushrooms to get some color.
  3. Combine miso, water, and sugar.  Add to mushroom and white scallion mixture, tossing to coat.  Sauce will thicken slightly.
  4. Drizzle with 1-2 tsp sesame oil, toss in sliced green scallions, and remove from heat.  Serve immediately.

IMG_3239

Pan-Seared Sake Sea Bass with Ginger and Scallions (serves 2)

Ingredients:

  • 8 oz sea bass filet
  • 2 tbl canola oil
  • Kosher salt
  • Pepper
  • 3 1/4-inch slices of ginger
  • 1 clove garlic, smashed
  • ~2.5-3 tbl sake
  • 1/2 inch piece of ginger, julienned
  • 2 scallions, sliced thinly on diagonal, green parts only
Instructions:
  1. Bring sea bass to room temperature by leaving out on the counter for at least 10 minutes prior to cooking.  Season liberally with kosher salt and pepper.
  2. Heat a heavy skillet over medium high heat.  Add oil and heat, adding smashed garlic clove and slices of ginger to infuse the oil while it is heating.
  3. Once the ginger and garlic are fragrant, sear fish, skin side down, about 6 minutes, or until skin is golden and fish is 3/4 cooked.  Baste a few times with oil in the pan.
  4. Lower heat slightly to medium, turn fish over and cook 2 minutes more, until just cooked through.  Transfer to heated plate and keep warm.
  5. Remove ginger and garlic used to infuse the oil, add julienned ginger to remaining oil and lower heat while ginger cooks for ~10-15 seconds.
  6. Deglaze the pan with sake, scraping up browned bits.  Remove pan from heat, add scallions and stir to wilt slightly.  Spoon scallion and ginger mixture over the sea bass and serve immediately.

Lemon Roasted Asparagus

Ingredients:

  • 1/2 bunch asparagus
  • olive oil
  • lemon zest
  • kosher salt
  • freshly ground pepper

Instructions:

  1. Preheat oven to 375 degrees F.
  2. Wash asparagus and trim tough ends.  Pat completely dry.
  3. Toss with just enough olive oil to coat.
  4. Season with salt and pepper to taste.  Grate fresh lemon zest over to taste.
  5. Roast until crisp-tender, ~10-15 minutes.

Happy New Year!

IMG_3030 Cung chuc tan xuan!  Xin nian kuai le! Growing up, I took for granted that we would always celebrate Lunar New Year by going over to our grandparents’ house, where my grandfather would put on his traditional blue robes and gift us with lucky red envelopes after we had wished him “prosperity, happiness, and more than 100 years of long life.”  He never seemed to mind hearing that over and over ;).  I did not realize then how much I had internalized or how much I would miss the traditions my parents sought to pass on to us, even as they lamented how U.S. celebrations paled in comparison to their memories.  I used to dress up with my friends in grade school and give our classmates a mini-presentation on Lunar New Year traditions and foods.  I should have had an inkling then of how much I had absorbed.

My first lunar new year away from my family was buffered by being in Boston, where there was a vibrant Asian community and college student groups got together to share the holiday.

In medical school, however, I had a taste of the disappointment my parents likely felt the first time they celebrated after leaving their homeland.  While I was excited by the holiday and its associations with spring (in California, anyway), my classmates were surrounded by snow piled several feet high and oblivious to why they should think about wearing red or eating noodles, sticky rice cakes, or dumplings.  So…I took matters into my own hands, and decided that I would cook as much as I could on my own.  I spent an entire day making nian gaoluo bo gaojiao zi, abalone, fish, noodles, chinese broccoliand cha gio.  It was a little crazy, but the best form of procrastination I could have wished for, and brought the holiday spirit even all the way out to the snowy tundra.

J loves dumplings so much that he has a bottomless stomach for them, so we made a batch a little while ago.  It seemed appropriate to make some today, and perhaps to share our recipe version.  As with many home recipes, quantities are more like guidelines and should be adjusted to personal preference.

Pork, shrimp, and leek dumplings (makes ~90)

Ingredients:

3 packages of round dumpling skins (about 3o per pack)
1 lb ground pork (not too lean)
1/2 lb shrimp, shelled, deveined, and finely minced
1/2 bunch of chinese chives, finely minced (about 3 cups chopped)
~1/2 napa cabbage, finely chopped (about 4 cups chopped)
~1-2 tsp grated ginger (optional)
kosher salt, divided use
freshly ground pepper
~1 tbl oyster sauce
~2 tbl soy sauce
~1 tbl Shaoxing wine
~1 tbl sesame oil
~1 tsp sugar
small bowl of water (for sealing the wrappers)
canola oil (for cooking)

Instructions:

  1. Lightly salt chopped cabbage and set aside for about 15 minutes at room temperature.  Squeeze cabbage in a cheesecloth, clean dish towel, or your hands to drain excess water.
  2. Combine pork, shrimp, napa cabbage, chives, and ginger in a large mixing bowl.  Season with oyster sauce, soy sauce, Shaoxing wine, sesame oil, and sugar, using hands if necessary to mix very well.  Check seasoning by cooking a small dollop of the mixture in a skillet over medium heat.  Adjust with further salt, sugar, and pepper to taste.
  3. Working with one wrapper at a time in the palm of your hand, spoon ~1 tbl of the filling onto the center of the wrapper.  Moisten the outer edge of one side of the wrapper with your index finger.  Fold one edge over and pleat – you can start from one end and pleat to the other, or pinch the middle together first and pleat from the middle to the end, one side at a time.  Be sure to press pleats tightly to seal. *
  4. To cook, you will need to cook in batches since they can only be cooked one layer at a time.  Heat 1-2 tbl canola oil in a nonstick pan (ceramic, cephalon, etc) over medium high heat.  Place the dumplings in one layer (flat side down) into the pan.  They should sizzle!  Let the dumplings cook about 2-4 minutes so that the bottoms become golden brown.  Add enough water so that there is about 1/4 inch of water in the pan, cover, and reduce heat to medium.  Cook for another 5-7 minutes, or until the water evaporates and you again hear the sizzling.
  5. Serve hot, with soy sauce, which can be mixed with black vinegar, sesame oil, hot chili sauce, chopped ginger, garlic, and/or scallions.

IMG_3027 IMG_3029

*if freezing, place dumplings in single layer on a tray and freeze the entire tray until the dumplings are frozen. Then remove them and pile them individually into a freezer bag.

Mini quiches for everybody!

Even when I was younger, I never felt that enthusiastic about the rigmarole of Valentine’s Day.  I’m hardly alone in thinking this, regardless of being single or in a relationship.  J and I were even dismayed last year when we made the mistake of going out for dinner during the weekend, and found that the menu for the pink and red holiday had been extended to the entire weekend.  Ugh.

That said, there is much joy to be found in life’s little pleasures and small, everyday gestures of love and affection.  For me, that means cooking and spending time with family and J.  I made these mini mushroom, spinach, and proscuitto quiches for an impromptu brunch with his family yesterday.  Crustless and portion-controlled, these savory bites were full of protein, vegetables, and flavor!

Mini quiches

Mini Mushroom, Spinach, and Proscuitto Quiches (makes ~12)

  • 2 small shallots, sliced
  • 1/2 tbl butter
  • 1/2 tbl olive oil
  • 10 oz crimini mushrooms, coarsely chopped
  • 2 cups baby spinach, roughly chopped
  • kosher salt
  • freshly ground pepper
  • 6 slices proscuitto (~3 oz), coarsely chopped
  • 4 large eggs
  • 4 egg whites
  • 1/4 cup 1% milk (or skim milk)
  • 1/3 cup grated cheese (fontina or gruyere; I used white cheddar since that’s what we had)

Instructions:

  1. Preheat the oven to 375 degrees F.  Lightly coat a 12-cup nonstick muffin pan with olive oil.
  2. In a nonstick skillet, heat the butter and olive oil.  Add the mushrooms, shallot, and season to taste with salt and pepper.  Cook until shallots are soft and the mushrooms are dry and lightly browned, about 10 minutes.  Turn off the heat and stir in the baby spinach until the spinach is just wilted, but still bright green, 2 minutes.  Set aside to cool slightly.
  3. In the same skillet over medium heat, crisp the proscuitto.  Set aside.
  4. Meanwhile, whisk the eggs, egg whites, and milk until well combined.  Season with a little salt and pepper.  Stir in the cheese.  Divide the egg mixture evenly between the muffin tins, filling them about halfway.  Top evenly with the mushroom and spinach mixture and then the crisped proscuitto.
  5. Bake until the quiches are well risen, golden brown and set, 20 to 25 minutes. Cool in the pan 5 minutes and then transfer to a wire rack. Serve warm or at room temperature.

Bisous, bisous, bisous!  Quiche, quiche, quiche!  😉

and to all, a good night!

Good things come in small packages

When people ask me if I like surprises, I’m usually a little wary…I’m not that into surprises, particularly if they involve some sort of unwanted public attention or an ‘adventure’ I’m not quite prepared for.  That said, I do like spontaneity, as any of my sometimes exasperated friends and family will attest…as structured as my weekdays can be due to work, my weekends often devolve into spontaneous mini (mis)adventures as I bumble around doing errands, chores, and whatever else catches my whimsy, in the kitchen and outside of the house.  In the cities I’ve lived in, I often can not resist the urge to explore yet another neighborhood or find an excuse to get outside to satisfy my restlessness.

In the kitchen, one package I never mind opening is anything en papillote.  I first tried the technique a few years ago, and recently rediscovered the delight of being presented with a ‘surprise’ for dinner.  😉 This is a wonderful, light, and elegant way to serve salmon, which packs a powerhouse of omega-3 fats, lean protein, vitamin D, vitamin B12/B3/B6, selenium, and phosphorus.  The recipe is also easily adapted to use other ingredients you may have at hand – capers and lemons, tomatoes and olives, asparagus and leeks – the possibilities are endless!

Salmon with Citrus and Fennel en Papillote (serves 2)

Ingredients:

2 skinless salmon filets (about 4-5 oz and 1 inch thick), preferably wild

4 tsp olive oil, divided use

1/2 small blood orange, thinly sliced

1/2 lemon (I used Meyer), thinly sliced with seeds removed

2-3 tsp lemon juice (from other 1/2 of lemon)

1/2 fennel bulb, thinly sliced

4 sprigs dill, roughly chopped

kosher salt

freshly ground pepper

parchment paper

Instructions:

1. Preheat oven to 400 degrees F.  Cut four 12-by-17-inch pieces of parchment paper. Fold each in half crosswise to make a crease, then unfold and lay flat.

2.  In a bowl, toss together 2 tsp olive oil, sliced fennel, blood orange, and lemon slices.
IMG_3135
3.  Season salmon fillets liberally with salt and pepper.

4.  Arrange fennel in a small mound on parchment paper near the crease.  Place salmon on top of the fennel and drizzle with 1 tsp olive oil and 1 tsp lemon juice.  Top with dill and then layer orange and lemon slices on top, alternating slices.
IMG_3136
5.  Fold each piece of parchment over, then make small overlapping pleats to seal open sides, creating half-moon-shaped packets.

6.  Bake on rimmed baking sheet for about 10 minutes, until packets are slightly puffed.
IMG_3139 IMG_3140

7. Transfer to plates and carefully cut packets open with kitchen shears or a small knife.  Enjoy!
IMG_3158 IMG_3147

Longing for spring…ramps.

When I lived in New York, I lived only a few blocks away from the green market.  As a transplant from California and homesick for the amazing produce, I reveled in the bounty of summer and fall, when the market was laden with seasonal fruits and vegetables.  By winter, the market’s colors waned as the leaves in Central Park also disappeared.  But as soon as the first glimmers of spring came, I saw stirrings of the glorious greens to come.

It was at the green market that I first discovered ramps.  RAMPS!  I’m not sure exactly how my obsession began, but from the first time I brought these somewhat pricey alliums home, I could not get enough of them.  I made ramps with soft scrambled eggs, ramp pizza, ramp risotto, and ramp pesto.  Perhaps my obsession stemmed from knowing that their arrival meant the coming of warmth back to the City and the Park, which would regain the beautiful lush green that I enjoyed on my runs.

Back in California, I brought home a bunch of chinese chives* the other day to make dumplings.  With a large portion of the bunch remaining, I decided to pay homage to the versatility of this other member of the allium family.  They are wonderful paired simply with softly scrambled eggs, but I chose to make a simple soup with chives and tofu, and stir-fried them to accompany pan-seared tofu.  Chinese chives and tofu two ways.  Not quite ramps, but still delicious and evocative of meals from my mother’s kitchen.

IMG_3131Stir-Fried Chinese Chives with Glazed Tofu

Ingredients

2/3 block of organic tofu (10-12 oz), sliced

4 tsp canola or safflower oil, divided use

3/4 lb chinese chives, cut into 3 inch segments (about 3-4 cups)

1 tsp red chili flakes (or to taste)

1/4 tsp salt, or to taste

1.5 tsp ginger, minced

1/2 tsp sesame oil

1 tbl oyster sauce

Instructions:

  1. Heat a well-seasoned wok over high heat
  2. Add 2 tsp canola oil, swirling to coat wok evenly, and heat until hot.
  3. Add chives and red pepper flakes and stir-fry, letting chives rest on bottom and sides of wok several seconds between stirs, until chives are tender and slightly browned, 2 to 4 minutes.
  4. Season with salt to taste.  Set aside and keep warm.
  5. Wipe out wok and heat over medium-high heat.
  6. Add remaining 2 tsp canola oil and pan sear tofu slices on both sides until golden, about 3-5 minutes each side.  Set aside.
  7. Add 1/2 tsp sesame oil and swirl to coat bottom of the pan.  Add minced ginger and stir until fragrant, about 1 minute.  Add in oyster sauce, turn off heat, and return tofu slices to the pan, turning gently to glaze.
  8. Top stir-fried chives with the pan-glazed tofu and serve immediately.IMG_3123

* Apparently, raw chinese chives have quite the pungent odor, unlike their cousins the ramps.  It was their ‘fragrance’ that led J’s friend Bao, who is no stranger to the likes of fish sauce, kimchi, durian, and other pungent Asian foods and condiments, to comment on how my kitchen smelled like a ‘proper Asian home.’  If that is synonymous with “Asian supermarket,” I’m not sure that’s a good thing.  :-/

Oven baked crispy soy ginger chicken wings

J continues to be flummoxed by how little I know about American football, despite growing up in the U.S.  He simply shakes his head at my clueless look when he runs around talking about first downs, field goals, and blahblahblah.  Fortunately, we can meet in the middle:  he watches football and I spend that time amusing myself by making him snacks like these, which are a slightly healthier version of the ubiquitous chicken wings that grace so many Super Bowl parties.  And maybe, just maybe, learn a little about football.

I’m a little reluctant to clean up the mess that comes with deep frying, so opted to oven-bake these using the Cooks Illustrated method instead.  With this method, fat is rendered by baking them at lower heat and then followed by browning at higher heat, achieving an enviable crispness and moistness that rivals the deep frying technique!

IMG_3109 IMG_3115
(Clearly, I made the salad for me 😉 ).

Oven Crispy Soy Ginger Chicken Wings

From Cook’s Illustrated Meat Book

Ingredients:

3 lbs chicken wings

2 tbl baking powder

3/4 tsp salt

sweet soy ginger glaze (recipe below)

Instructions:

1. Adjust oven racks to lower-middle and upper-middle positions and preheat to 250 degrees F.  Set a wire rack onto a foil lined rimmed baking sheet.

2.  Pat dry and prep chicken wings and place into a large ziplock bag with baking powder and salt.  Seal and toss to coat evenly.

3.  Arrange the wings, skin side up, on a single layer on the rack and bake on the lower rack in the oven for 30 minutes at 250 degrees F.

4.  Move the wings to the upper rack, increase the temperature to 425 degrees F, and roast until golden brown and crispy, about 40-50 minutes. Rotate the sheet halfway through baking to allow for even browning.

5.  Remove from the oven and let stand 5 minutes before transferring to a large bowl and tossing with wing sauce.  Enjoy hot!

Sweet Soy Ginger Glazed Wing Sauce

Adapted from Ravenous Couple

Ingredients:

1 cup water

1 cup thinly sliced ginger

2 cloves garlic, sliced

2 tbl low sodium soy sauce

1 tbl fish sauce

1/2 cup brown sugar

1/4 cup rice vinegar

2 tbl honey

1 to 2 tbl sriracha (may adjust according to taste)

Instructions:

1. In a small saucepan, combine water, ginger, garlic, soy sauce, fish sauce, vinegar, sugar and chile and bring to a boil.

2. Add honey and reduce by half until it has the consistency of maple syrup and set aside.

Not your usual spaghetti…

IMG_3083

Do you fear the carbs?

I spend a good portion of my patient time counseling patients on how to manage their weight and diabetes, and often that involves talking about food choices, nutrition, and exercise (yes!  a few of my favorite things!).  Some of my patients hardly know where to start, while others have embraced multiple fads (Atkins, South Beach, Paleo, Grain Brain, Gluten-free, etc), sometimes even eliminating whole food groups or cooking (i.e. only eating raw) in their efforts to lose weight and feel better.  There is a lot of controversy over carbohydrates, which have recently been cast as the new enemy in our fight against diabetes and obesity.

I wish I had an answer for “Which diet is the best diet,” but I don’t.  The best diet is the one you actually adhere to, the one you can follow sustainably.  For me, that means a more plant-based diet that emphasizes fresh, seasonal fruits and vegetables, while also incorporating lean protein, whole grains, and good fats.   Make your calories count, and be mindful of avoiding foods that are highly caloric but not necessarily nutritious.   It’s amazing how different 2,000 calories can look on your plate, depending on what you choose.

I think that carbohydrates (whole grain, unprocessed and unrefined ones) do have a place in our diet and can be enjoyed in moderation.  For those seeking to expand their options beyond pasta, however, the following is a tasty rendition of spaghetti squash – this would never be a substitute for pasta…it stands alone as a tasty interpretation of this now very popular squash, which is low in calories, high in fiber, and contains folic acid, potassium, vitamin A, and beta-carotene. 

Spaghetti Squash with Prosciutto, Lemony Kale, and Cherry Tomatoes

Ingredients

  • 1 spaghetti squash
  • 1-2 tablespoons olive oil
  • 1 shallot, sliced thinly
  • 1 clove garlic, minced
  • 3 slices proscuitto, chopped
  • ½ tablespoon minced fresh rosemary
  • 2 packed cups of chopped kale leaves
  • ½ lemon, juiced
  • ¼ cup oven roasted cherry tomatoes*
  • ¼ cup toasted pine nuts
  • salt & pepper
  • optional: freshly grated parmesan cheese

Instructions:

  1. Preheat oven to 375 degrees F.
  2. Slice squash in half lengthwise and remove seeds.  Drizzle cut surface with olive oil and season with salt and pepper.  Place the squash on a baking sheet, cut side up. Roast for about ~30-45 min until the flesh is tender and you can scrape noodle-like strands with a fork.
  3. Remove squash from the oven, cool slightly and use a fork to scrape the squash into strands.  Set aside.
  4. In a large skillet over medium heat, add about 1 tbl olive oil to the pan.  Saute shallot and proscuitto until slightly crisp.  Add garlic, rosemary, and chile flakes.
  5. Add the kale leaves and a good pinch of salt.  Stir in lemon juice.
  6. Once the kale is partially wilted, add the squash strands, a little grated cheese, the oven roasted cherry tomatoes, and salt and pepper, to taste. Toss to incorporate.
  7. Remove from heat and top with toasted pine nuts and extra grated cheese.

* for oven roasted cherry tomatoes – halve cherry tomatoes crosswise and toss with a little olive oil, making sure they are evenly coated.  Lightly season with salt and pepper.  Stir in minced herbs if using (e.g. thyme or rosemary).  Roast in preheated oven at 250 degrees F for about 1 hr or until shriveled and almost dry, with a little juice.