Unplugged.

J and I decided that for our next brief trip (all of 4 days!), we were going to be completely unplugged from work.  Since starting, I have yet to be separated from my work inbox, with its daily onslaught of patient messages, calls, labs, staff messages, prescription refills, etc, etc.  I try to clear it by the end of the day, only to log in several hours later to find that it is once again filled with new things to address.

To that end, I brought my phone along on our trip but otherwise made a point of leaving my computer at home.  I admittedly had separation anxiety and was fidgeting to check in as day 1 approached.  By day 2, I couldn’t believe how it felt to be unplugged.  It. was. so. l-i-b-e-r-a-t-i-n-g!  As grateful as I am to have an electronically medical record and the technological advances we have, it has so blurred the lines between work and home that I never feel completely done with work.  It makes it hard to find some semblance of work-life balance…I went into this field knowing it could and would consume most of my waking hours and energy, but I do not think this means neglecting personal priorities.  Physician, heal thyself – otherwise, how can I possibly hope to care for others?

And so, during one of our mornings free, I made this lovely frittata – it felt celebratory in more ways than one, featuring spring’s fresh and sweet asparagus.

IMG_3433 IMG_3439
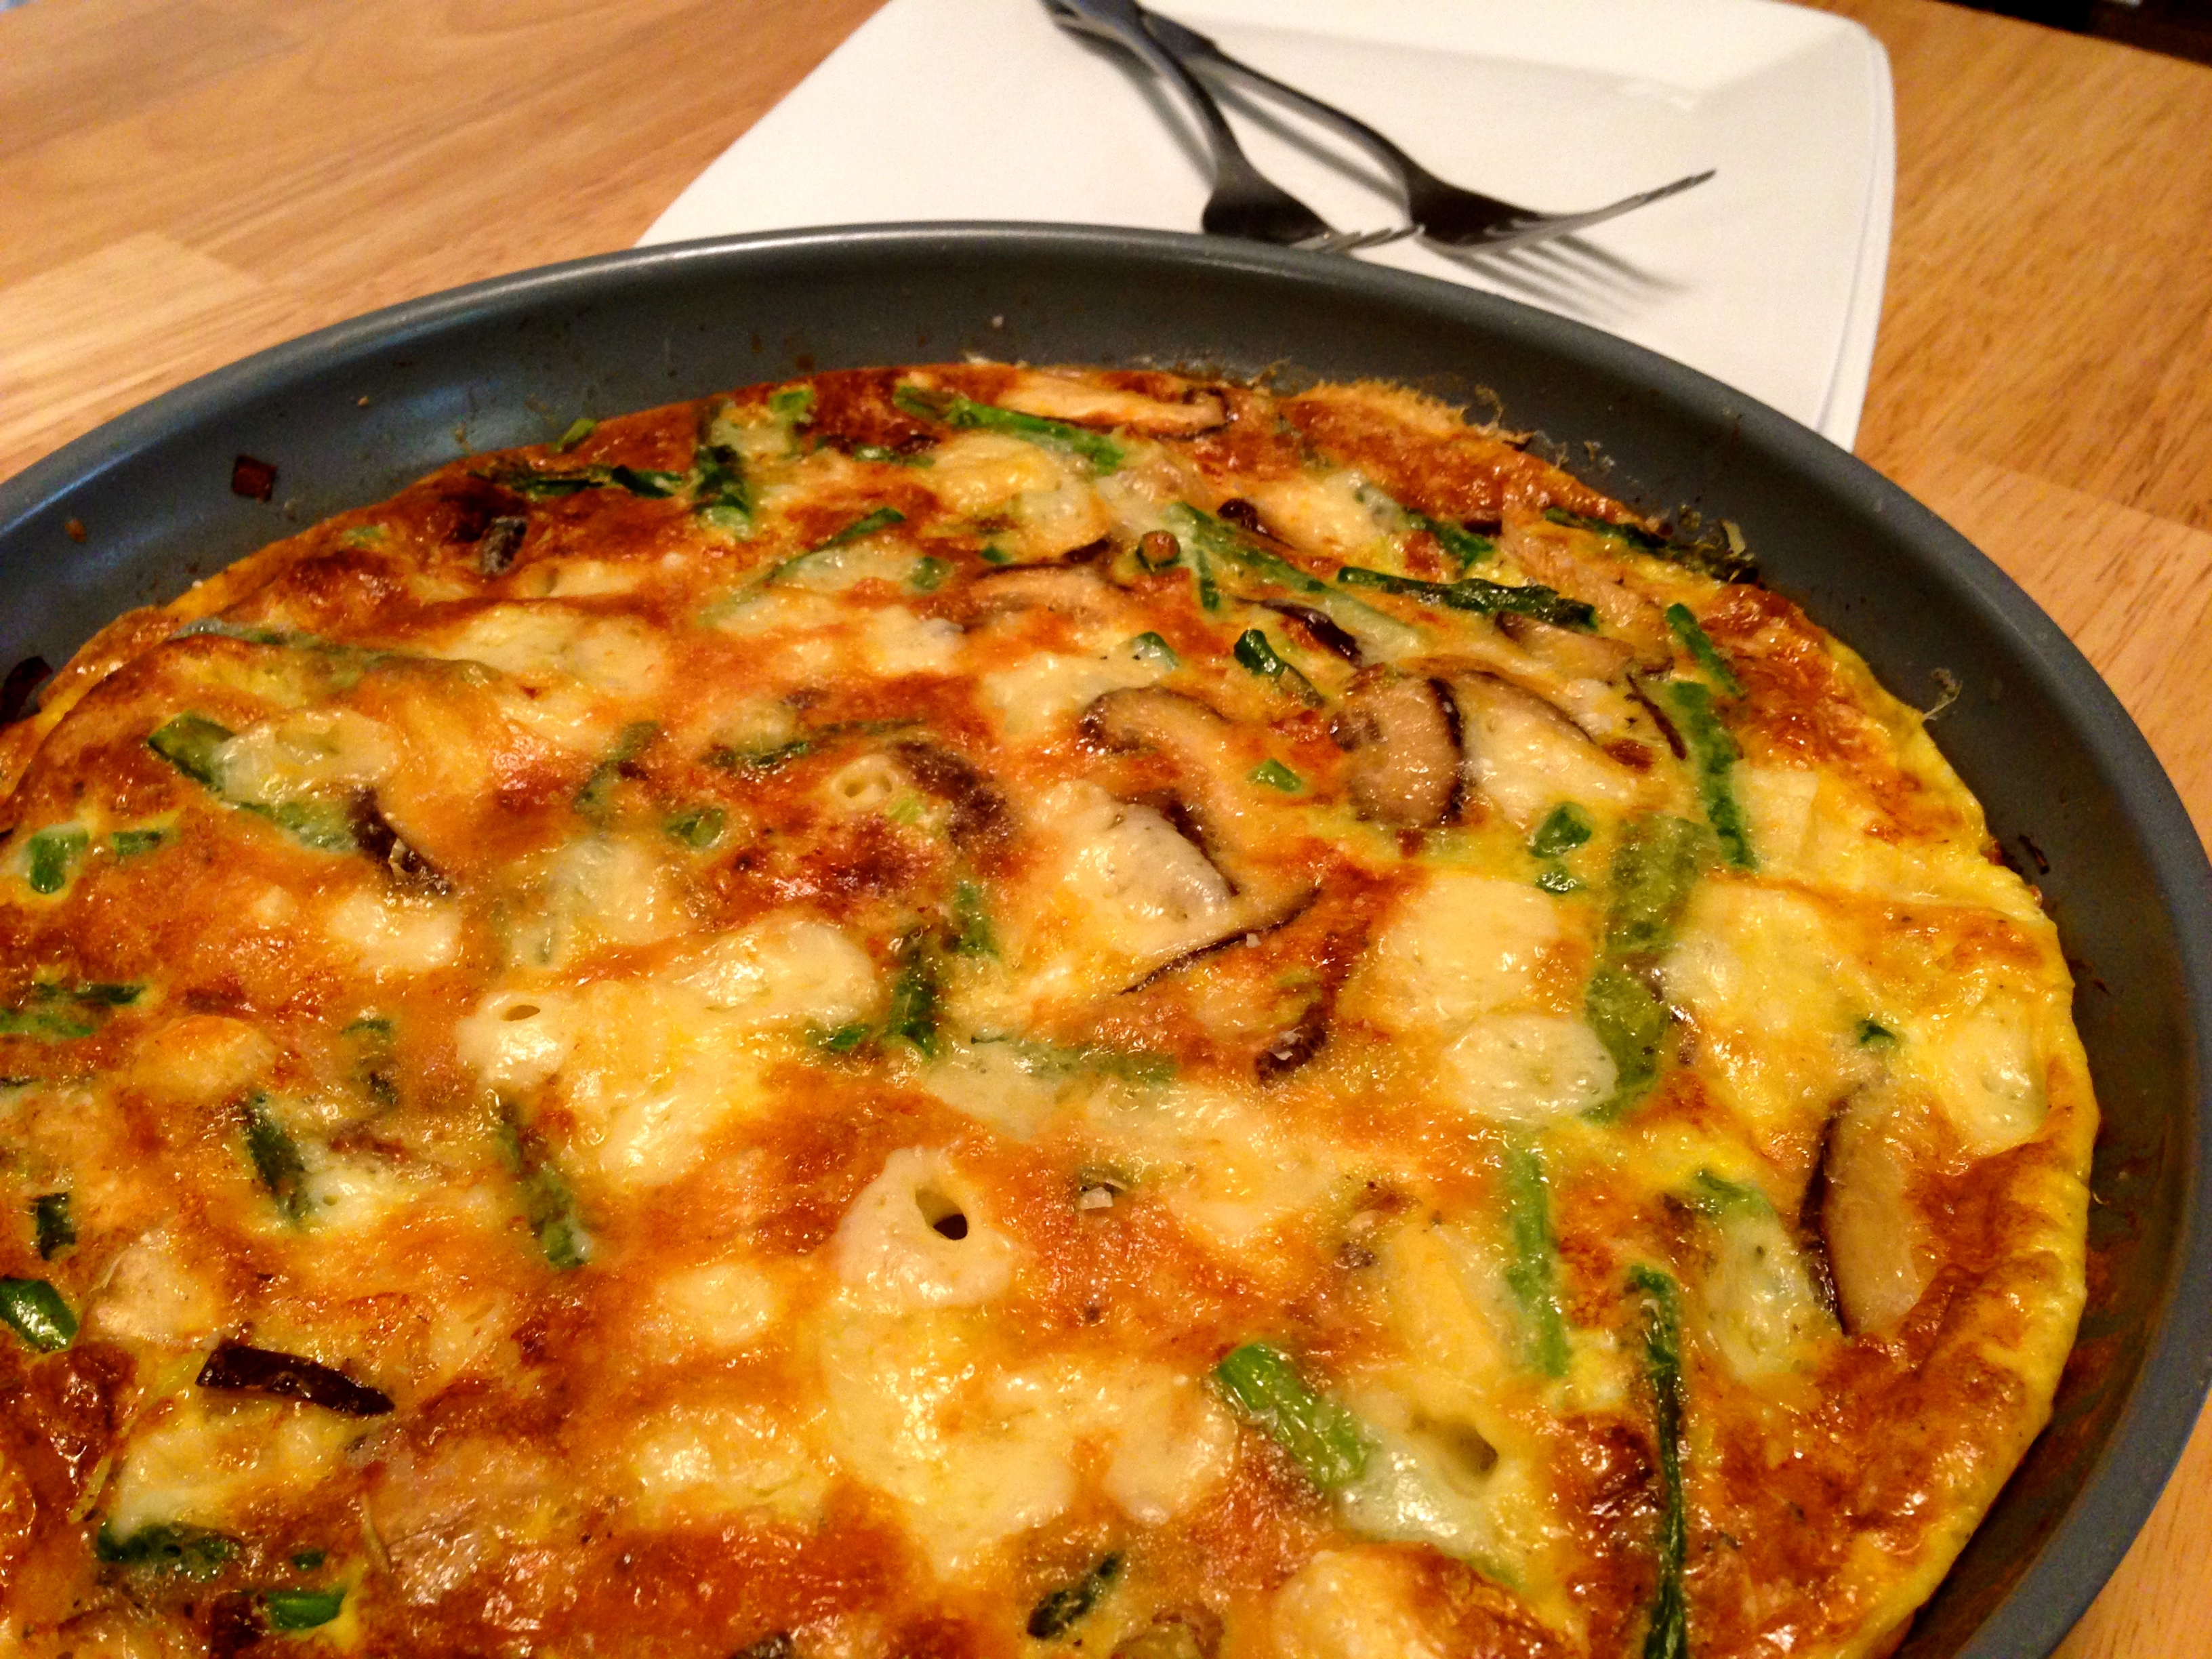
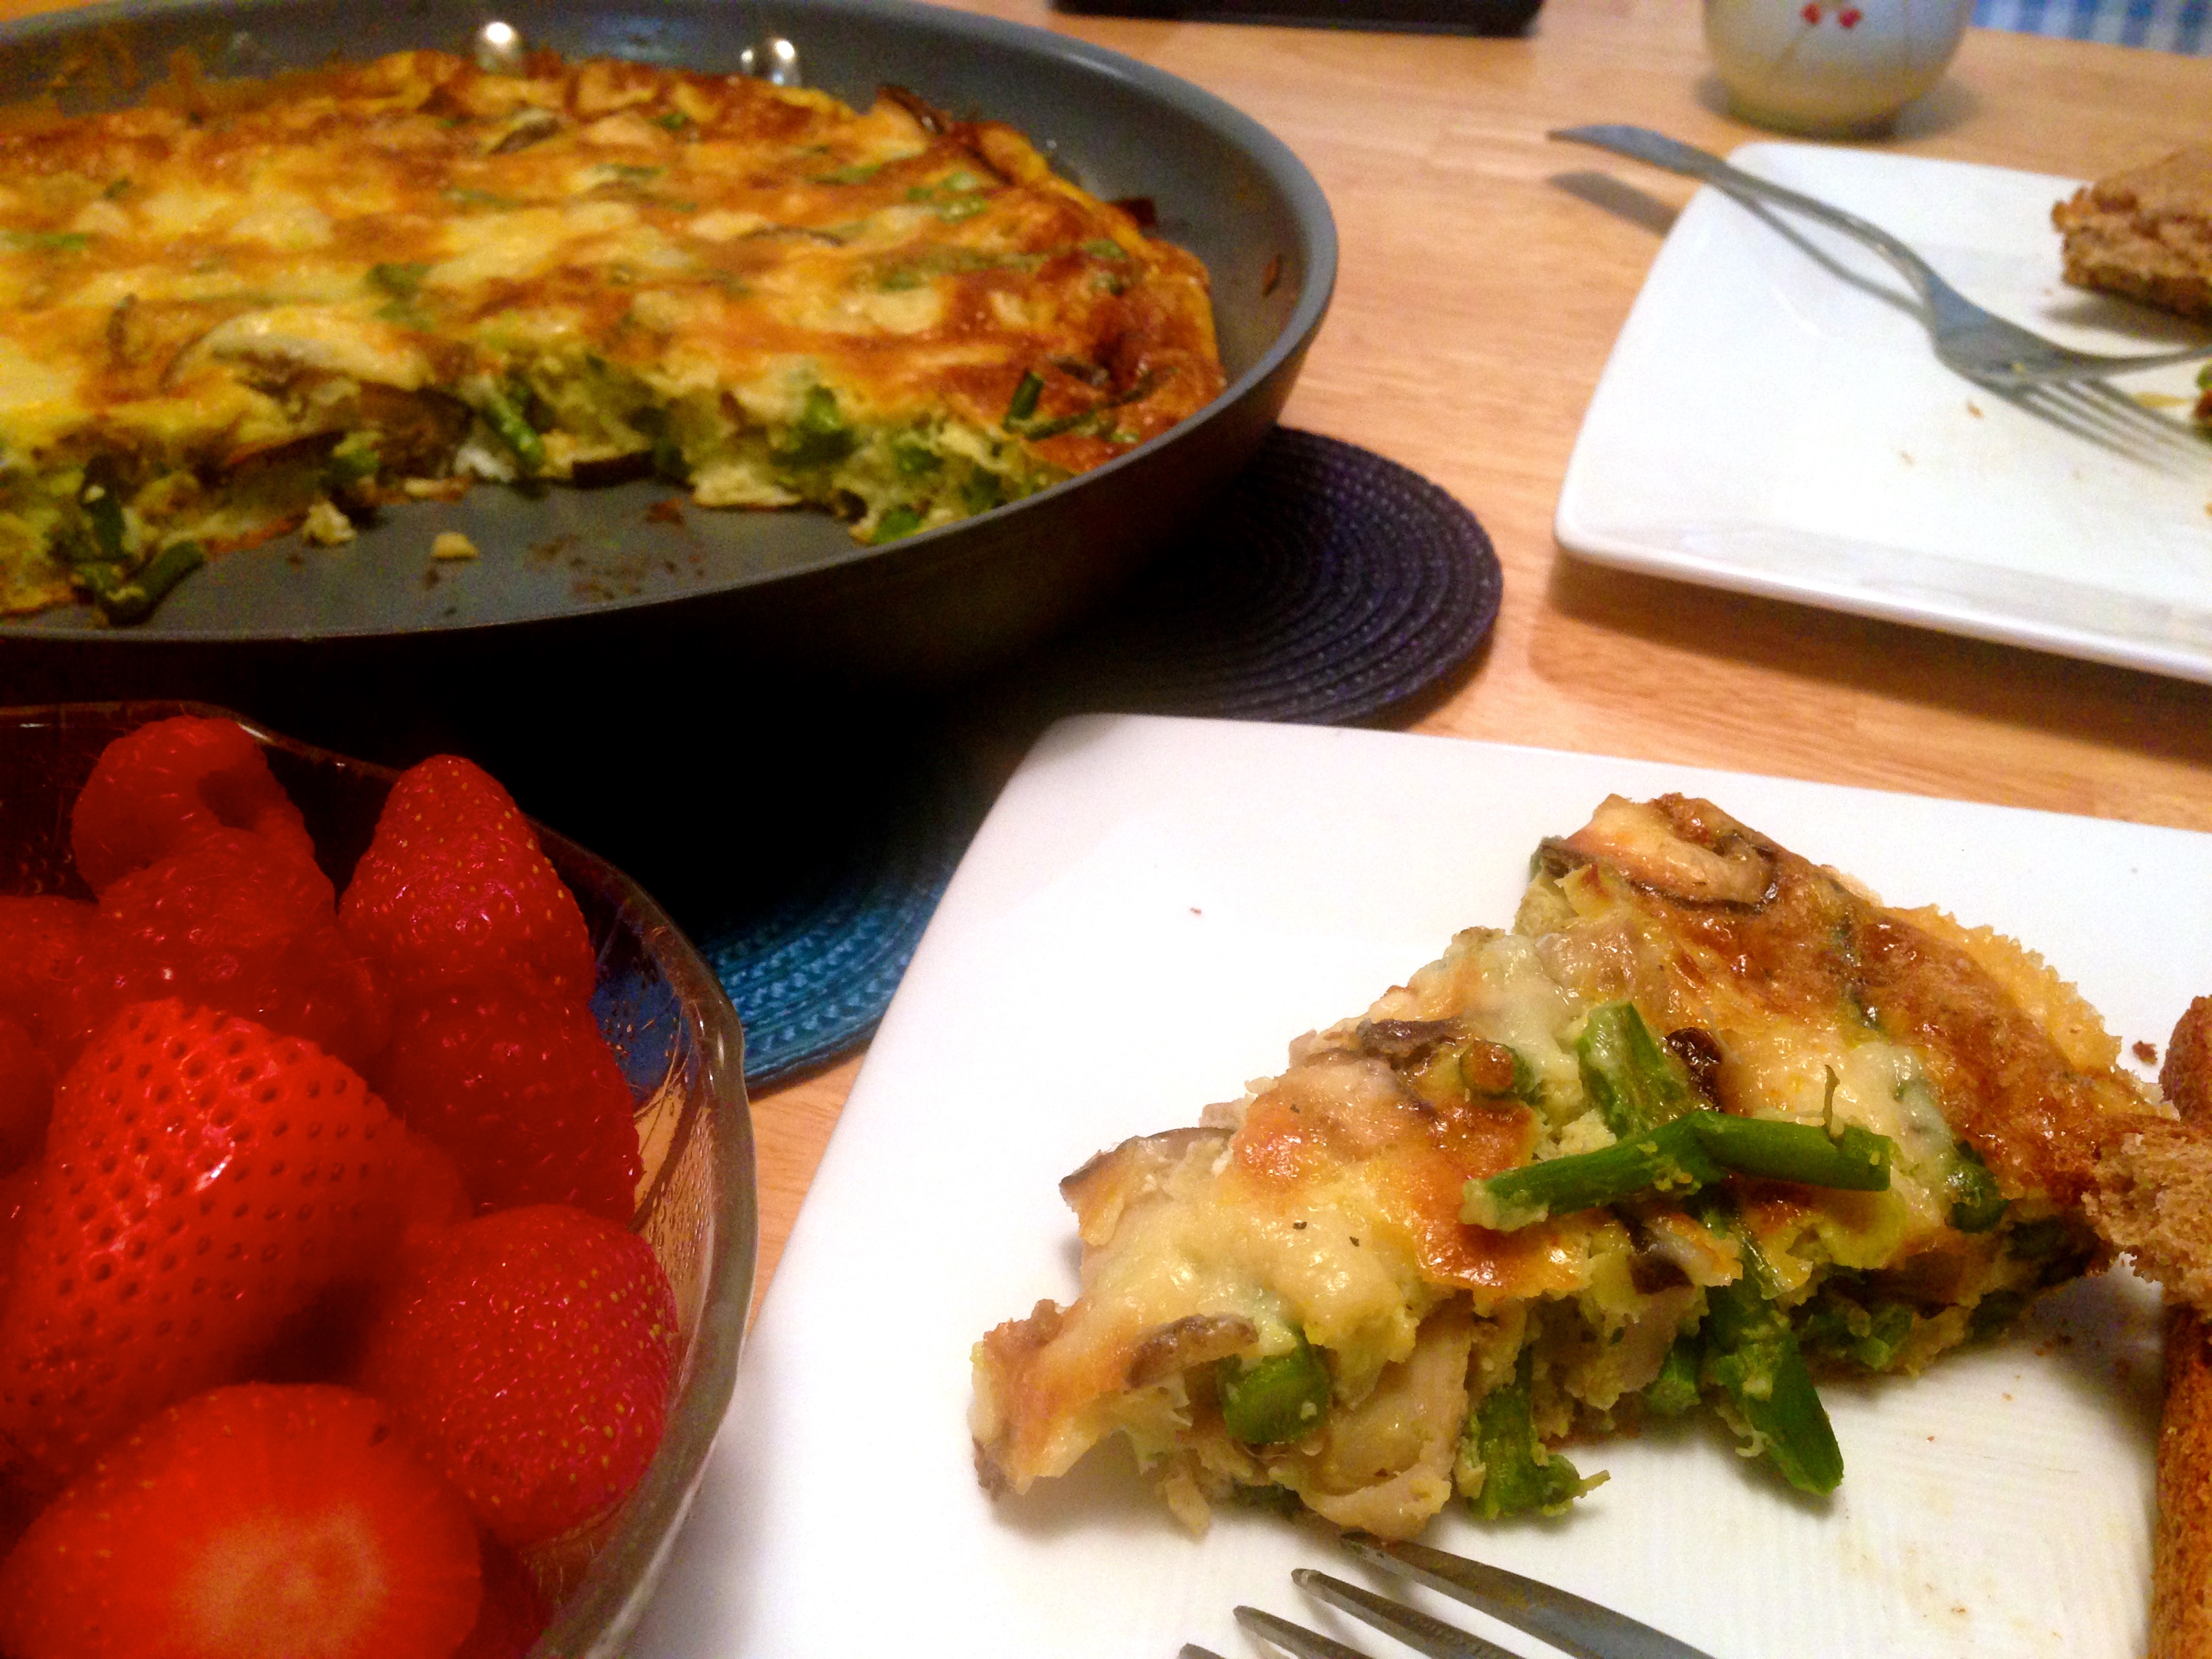
Asparagus, Leek and Mushroom Frittata (recipe adapted from here)

Ingredients:

  • 1.5-2 tablespoons olive oil
  • 1 cup chopped leeks (white and pale green parts only)
  • 1 12-ounce bunch thin asparagus, trimmed, cut on diagonal into 1-inch pieces (about 2 1/2 cups)
  • 1 cup sliced stemmed shiitake mushrooms
  • 8 large omega-3 eggs
  • 1 cup diced Gruyere cheese, divided
  • 1/2 teaspoon salt
  • 1/2 teaspoon ground black pepper
  • 1/4 cup grated Parmesan cheese

Instructions:

  1. Preheat broiler.
  2. Heat olive oil in 10-inch-diameter nonstick skillet over medium heat.
  3. Add leeks and sauté 4 minutes. Add asparagus and shiitake mushrooms, sprinkle lightly with salt, and sauté until tender, about 6 minutes.
  4. Whisk eggs, 3/4 cup Gruyere cheese, 1/2 teaspoon salt, and 1/2 teaspoon pepper in medium bowl.
  5. Add egg mixture to skillet; fold gently to combine. Cook until almost set.
  6. Sprinkle remaining 1/4 cup Gruyere cheese and Parmesan cheese over. Broil until frittata is puffed and cheese begins to turn golden, about 3 minutes. Cut into wedges and serve.
Advertisement

On lemons and sweet spring treats

It’s so interesting to see how the palate evolves as we age, and how things that may  appeal to us as adults really did not hold much allure when we were younger.  I was reminded of this last weekend when I was trying to decide what to bake to bring to a friend’s son’s birthday party.  Her son is allergic to eggs, so I wanted to bring something egg-less and spring-y that he might still be able to try.  Fortunately, she is also a wonderful mother/cook/baker, so she has already figured out ways to bake him yummy treats sans eggs, including his super-cute Cars-themed birthday cupcakes.

I settled on lemon shortbread (he likes citrus!) and more conventional sugar cookies to provide both options for those with and without allergies.  I’m not sure how the kiddos responded to the lemon shortbread, since I eventually realized that   the humble-looking shortbread is not as appealing a cookie to them as something w/ melty chocolate or drizzled with luscious icing.  =(

For those adults looking for a bright, lemon-y treat, however, these lemon shortbread cookies are just the thing!

IMG_3408Meyer Lemon Shortbread (recipe adapted from here)

Ingredients:

  • 2/3 cup (150g) unsalted butter, softened
  • 1/3 cup + 1 tablespoon (55g) confectioner’s sugar, sifted
  • ¼ cup (60ml) Meyer lemon juice
  • finely grated zest of 2 Meyer lemons
  • 1 teaspoon vanilla extract
  • 1 ¾ cups + 1 tablespoon (255g) all purpose flour, sifted
  • 2 tablespoons corn starch, sifted
  • 2/3 cup (94g) additional confectioner’s sugar, sifted

Instructions:

  1. Place the butter and icing sugar in the bowl of an electric mixer and beat for 8 minutes or until pale and creamy.
  2. Add the lemon juice, zest and vanilla and beat until combined.
  3. Add the flour and corn starch and beat just until a smooth dough forms.
  4. Turn dough onto a lightly floured surface and divide in half.
  5. Place each half onto a large piece of parchment paper and form into a 20cm (8in) long log. Wrap well in the paper and refrigerate for 1 ½ hours or until firm.
  6. Preheat the oven to 180°C/350°F. Line two large baking sheets with parchment paper.
  7. Unwrap one of the dough logs (keep the other in the fridge) and slice it into 1cm-thick rounds.
  8. Place onto the prepared baking sheets 5cm (2in) apart and bake for 15-18 minutes or until light golden.
  9. Remove from the oven and cool in the sheets for 5 minutes.
  10. Gently toss the warm shortbreads in the extra icing sugar and allow to cool completely on wire racks.

And for those who haven’t quite let go of their inner child (::raises hand::), here is a recipe for super easy sugar cookies that look wonderful (and taste great!) when cut into playful spring shapes and decorated for Easter:

IMG_3445
Sugar Cookies
 
(recipe modified from Alton Brown’s recipe)

Ingredients:

  • 3 cups all-purpose flour
  • 1 1/2 teaspoons baking powder
  • 1/4 teaspoon salt
  • 1 cup unsalted butter, softened
  • 1 cup sugar
  • 1 egg, beaten
  • 1 tsp vanilla
  • 1/2 tsp almond extract
  • Powdered sugar, for rolling out dough

Instructions:

  1. Sift together flour, baking powder, and salt. Set aside.
  2. Cream together butter and sugar until light in color.
  3. Add vanilla and almond extracts and egg.  Beat to combine.
  4. Gradually add flour, beating just until the mixture pulls away from the side of the bowl.  If it seems too stiff, wet hands, turn out the dough and finish kneading by hand.
  5. Divide the dough into portions, wrap in waxed paper or parchment, and refrigerate for 2 hours.
  6. Preheat oven to 350 degrees F.
  7. Sprinkle surface where you will roll out dough with powdered sugar.
  8. Remove 1 wrapped pack of dough from refrigerator at a time, sprinkle rolling pin with powdered sugar, and roll out dough to 1/4-inch thick.  Move the dough around and check underneath frequently to make sure it is not sticking.
  9. Cut into desired shape, place at least 1-inch apart on parchment paper or silicone baking mat, and bake for 6-8 minutes or until cookies are just beginning to turn brown around the edges, rotating cookie sheet halfway through baking time.
  10. Let sit on baking sheet for 2 minutes after removal from oven and then move to complete cooling on wire rack.
  11. Serve as is or ice as desired. Store in airtight container for up to 1 week.

“Not so devilish” noodles

Shirataki noodles are thin, translucent, gelatinous traditional Japanese noodles made from the konjac yam (aka devil’s tongue yam or elephant yam).  They are mostly comprised of glucomannan starch, which is an indigestible fiber.  While very low in carbohydrates and calories and lacking much flavor of their own, shirataki noodles easily pick up the flavors of whatever sauce they are in.  Their slippery texture may be a little unfamiliar to some, but dry roasting them in a non-stick pan can give them more of a pasta-like consistency.

Convenience-wise, shirataki noodles couldn’t be easier – just drain, rinse, and then use!  J. Kenji López-Alt from Serious Eats even has a great recipe for  Sichuan-style shirataki noodle and cucumber salad and sings their praises here.

Shirataki noodles stir-fried with vegetables provided a quick and healthy weeknight dinner.  No need to feel ‘devilishly’ indulgent, here!

IMG_3421Shirataki Noodles with Mushrooms and Sweet Bell Pepper

Ingredients:

  • 7 oz shirataki noodles
  • 4 oyster mushrooms, sliced
  • 4-5 crimini mushrooms, sliced
  • 4-5 baby bell peppers, julienned
  • 3 scallions, sliced into 1 inch segments, white and green parts separated
  • 1/2 tsp black bean soy paste
  • 1/2 tsp sugar
  • 2 tsp low-sodium soy sauce
  • 2 tsp canola oil
  • 1/2 tsp sesame oil
  • 2 cloves garlic, minced
  • 1 tsp sriracha
  • Salt to taste
  • Toasted sesame seeds (optional)

Instructions:

  1. Drain and rinse shirataki noodles.  Set aside.
  2. In a nonstick skillet, heat canola oil over medium-high heat.
  3. Add oyster and crimini mushrooms with a pinch of salt to the pan and stir-fry for 1-2 minutes, until they begin to soften and slightly brown at the edges.  Add minced garlic, soy paste, sugar, and 1 tsp low-sodium soy sauce.  Stir-fry for another 1-2 minutes.
  4. Add bell peppers and the chopped white scallion, stir-frying until crisp tender.
  5. Add drained shirataki noodles to the vegetable mixture, seasoning with remaining 1 tsp low sodium soy sauce, sesame oil, and sriracha.  Toss in chopped green scallion and  stir-fry for another 1-2 minutes to let the flavors meld.   Adjust seasoning.
  6. Garnish with toasted sesame seeds and serve immediately.

Saffron: worth its weight in gold

Or more, if you attach to it the immense thoughtfulness that my friend Erika had in bringing back a good quantity of it for me from her travels in Turkey, Morocco, and Greece.  I couldn’t join her on her travels, but she helped me get a taste of her adventures by bringing back this cherished spice and inspiring me to experiment with it in the kitchen.

Saffron, with its sweet and grassy notes, is truly a labor-intensive spice to collect.  It is derived from the stigmas of Crocus sativus.   Each plant bears up to four flowers, which each only have 3 stigmas.   It takes 150,000 to 170,000 flowers to glean just 1 kg of the precious saffron threads, and requires the equivalent of 40 hrs of labor.  It is widely used in the cooking of many cuisines, including the paella of Spain, the Milanese risotto of Italy, the bouillabaisse of France, and the biryani of South Asia.  Its vibrant beautiful color adds brightness to all of these dishes, as well as a unique flavor.

J and I have used it lately to make paella (recipe to come later!) but tonight I used it very simply to poach cod, with delightful results.  I paired the poached cod and saffron broth with a refreshing shaved asparagus salad.  It was a quick and healthy weeknight meal, full of bright and interesting flavors!

Gently simmering the cod in the broth is key to achieving buttery, flaky cod (and avoiding rubbery fish).

IMG_3432Poached Cod with Saffron-Tomato Broth (adapted from here)

Ingredients (serves 2)

  • tablespoons olive oil
  • 2 cloves garlic thinly sliced
  • 1/2 teaspoon Aleppo pepper or 1/4 teaspoon crushed red pepper flakes
  • ~1 cup (8 oz) of quartered grape tomatoes
  • ~2 tablespoons dry white wine
  • bay leaves
  • pinch of saffron threads
  • Kosher salt and freshly ground black pepper
  • two 4-5-oz. skinless cod fillets

Instructions:

  1. Heat oil in a medium skillet over medium heat. Add garlic and Aleppo pepper (or red pepper flakes) and cook, stirring often, until fragrant (garlic should not take on any color), about 3 minutes.
  2. Add tomatoes, wine, bay leaf, saffron, and ~1/4 cup water. Bring to a boil, reduce heat, and simmer until flavors meld, 5–7 minutes; season with salt and pepper.
  3. Reduce heat to medium-low; season cod with salt and pepper and place in skillet. Cover and cook at a bare simmer until cod is opaque throughout and beginning to flake, 5–7 minutes (thicker pieces will take longer to cook).
  4. Gently transfer cod to shallow bowls and spoon poaching liquid over.

Shaved Asparagus Salad with Lemon-Parmesan Dressing (original recipe from Food and Wine)

Ingredients:

  • 1/2 pound large asparagus
  • 1/4 cup coarsely grated Parmigiano-Reggiano cheese (3/4 ounces)
  • 3/4 tablespoons fresh lemon juice
  • 1/2 tablespoon warm water
  • 1 tablespoon extra-virgin olive oil
  • Kosher salt and freshly ground pepper, to taste

Instructions:

  1.  Using a vegetable peeler, shave the asparagus into long, thin strips and transfer to a large bowl.
  2.  In a small bowl, mix the Parmigiano-Reggiano with the lemon juice, water and olive oil. Add to the asparagus and toss to coat. Season the salad with salt and pepper and serve at once.

A berry cozy morning…

I can be a creature of habit, and as J will readily confirm, rather particular when it comes to certain foods and tastes.  He hypothesizes that we get along so well because he shares a lot in common with my sister L’s tastes, so I’m used to the overlap in the venn diagram of our preferences, even if  the “circle” of foods he enjoys is much larger than mine.   I disagree – I will eat practically any vegetable or fruit!

When it comes to oatmeal, we definitely have our own preferences and tastes.  I prefer plain oatmeal that I flavor with whatever I feel like at the time – seasonal fruit, spices, nuts…I like the chewiness of rolled or steel cut oats and I don’t like it when the oatmeal is a touch on the watery side.  He is much less demanding and is happy to go with the packaged stuff, and tries to mollify me by making it less watery and using half plain quick oats so that I’m not horrified by the cloying sweetness.

That said, this baked oatmeal is versatile, delicious, healthy…and a perfect compromise!  It takes more time than instant oatmeal, but is still super easy to throw together.

IMG_3397

Baked Oatmeal with Mixed Berries and Almonds (recipe adapted from here)

Ingredients:

  • 2 cups/7 oz/200 g rolled oats
  • 1/2 cup/2 oz/60 g sliced almonds, toasted
  • 1/3 cup/2 oz/60 g natural cane sugar or maple syrup, plus more for serving
  • 1 teaspoon aluminum-free baking powder
  • 1 1/2 teaspoons ground cinnamon
  • Scant 1/2 teaspoon fine-grain sea salt
  • 2 cups/475 ml milk (I used unsweetened almond milk)
  • 1 large egg
  • 1 1/2 tablespoons unsalted butter, melted and cooled slightly
  • 2 teaspoons pure vanilla extract
  • 2 ripe bananas, cut into 1/2-inch/1 cm pieces
  • 1 1/2 cups/6.5 oz/185 g mixed berries

Instructions:

  1. Preheat the oven to 375°F/190°C with a rack in the top third of the oven. Generously butter the inside of an 8-inch/20cm square baking dish.
  2. In a bowl, mix together the oats, half the almonds, the sugar, if using, the baking powder, cinnamon, and salt.
  3. In another bowl, whisk together the maple syrup, if using, the milk, egg, the butter, and the vanilla.
  4. Arrange the bananas in a single layer in the bottom of the prepared baking dish. Sprinkle two-thirds of the berries over the top. Cover the fruit with the oat mixture. Slowly drizzle the milk mixture over the oats. Gently give the baking dish a couple thwacks on the countertop to make sure the milk moves through the oats. Scatter the remaining berries and remaining almonds across the top.
  5. Bake for 35 to 45 minutes, until the top is nicely golden and the oat mixture has set. Remove from the oven and let cool for a few minutes. Sprinkle with a bit more sugar or drizzle with maple syrup if you want it a bit sweeter.

Chasing away the Monday blues…

with Blueberry Meyer Lemon scones didn’t really work today, but at least the day started (and ended, because yes, it was one of those days) on a sweet, citrus-y and flowery note. I could go on and on about Meyer lemons, but I won’t – suffice it to say that when I spotted them all the way in NYC, it reminded me of how far I was from home and how much I missed California produce.  Now that I’m back, I have access to J’s mother’s tree, which is truly the tree that keeps on giving…Meyer lemons in abundance!  And the largest, most beautiful ones I’ve seen as well!  IMG_3391

Blueberry Meyer Lemon Scones (recipe adapted from here)

Ingredients:

  • 1 1/2 cups all purpose flour
  • 2 1/4 tsp baking powder
  • 1/4 tsp kosher salt
  • 1/4 cup plus 3/4 tablespoon sugar
  • 6 tbl (3/4 stick) chilled unsalted butter, cut into 1/2-inch cubes
  • 3/4 cups blueberries
  • 1/2 cup plus 1/2 tablespoon buttermilk
  • 1-2 tbl Meyer lemon juice
  • 1 1/2 tablespoons finely grated Meyer lemon peel

Ingredients:

  1. Position rack in top third of oven and preheat to 425°F.
  2. Line large baking sheet with parchment paper.
  3. Whisk flour, baking powder, salt and 1/4 cup sugar in large bowl. Using fingertips, rub in chilled butter until pieces are size of small peas.
  4. Mix 1/2 cup buttermilk, Meyer lemon juice, and finely grated Meyer lemon peel in glass measuring cup.
  5. Pour buttermilk mixture into dry ingredients and stir until dough begins to form (some of flour will not be incorporated).
  6. Transfer dough to lightly floured work surface and gather together. Fold in blueberries and knead dough briefly, about 5 turns.
  7. Form each dough into ball and flatten into 1-inch-thick disk. Cut each disk into 6 wedges or cut with biscuit cutter into desired shape.
  8. Transfer scones to prepared baking sheet, spacing 1 inch apart.
  9. Brush tops with remaining 1/2 tablespoon buttermilk and sprinkle with remaining 3/4 tablespoon sugar.
  10. Bake until scones are golden brown on top and toothpick inserted into center comes out clean, about 15-20 minutes.

Goodbye winter, hellooooo spring!

And what a beautiful spring it already is in sunny California!  My friends back East have been treated to another dusting of snow, but here on the West Coast the weather has been warm and the streets have been lined with flowering trees.  It is one of my favorite times of the year.

I had some lovely pears left in my refrigerator, which I accidentally let ripen too much in the midst of a hectic work schedule.  Since I like my fruit crisp and at its peak (not soft), I decided to turn the pears into this lovely Italian pear cake – it was my way of saying adieu to winter and its warm, spice-filled dishes.  This cake is surprisingly light and fluffy thanks to the corn starch, and lightly sweetened.  I added a little cinnamon for a little extra warmth.

IMG_3374 IMG_3379Italian Pear Cake (original recipe here)

Ingredients:

  • 3 ‘very’ ripe small pears (or 2 large ones) – peeled & cut into chunks
  • 1 & 1/4 cup all purpose flour, sifted
  • 3/4 cup granulated sugar
  • 1 tbsp baking powder
  • 1/4 cup corn flour (corn starch)
  • 1/2 tsp cinnamon (optional)
  • 1 pinch salt
  • 1/3 cup + 1 tbsp butter (slightly melted)
  • 3 eggs
  • confectioner’s sugar (to sprinkle/ decorate on cake)

Instructions:

  1. Pre-heat the oven to 350°F.
  2. Cream the eggs and sugar until light and fluffy.
  3. Sift the flour, corn starch, cinnamon (if using), salt, and baking powder together.
  4. Add the flour mix and stir well, add the butter till the batter is smooth.
  5. Lightly grease and then line a 9-inch (23 cm) springform cake pan with parchment paper, and pour in the batter.
  6. Peel the the pears, cut in chunks and drop them on the cake, gently pushing down each piece of pear. It doesn’t matter if the pear sticks out of the cake it will all blend in.
  7. Bake for 25-30 minutes, or until a toothpick comes out clean – do not overtake! Leave to cool before serving.
  8. When cool, dust with confectioner’s sugar.
  9. (Optional) Serve with whipped cream.

On sweet revenge…

It’s been a busy week, with a few more downs than ups after a fun-filled birthday weekend.  I’ve started developing a little carpal tunnel syndrome from all the chart documentation I’ve been doing since I started working.  The EMR is both a blessing and a curse.  I spend more time in from of a computer than I do with my patients, and no, that is *not* why I went into medicine.

That said, it’s been a full week, too.  March is a month full of joyful birthdays!  One of my closest childhood friends has her birthday on St. Patrick’s day, so her birthday is always doubly lucky and green ;).  I dug out the green shirt and made a vibrant green salad to celebrate the day, even though I couldn’t join her for a green beer!

IMG_3361Green Salad with Cilantro-Lemon Vinaigrette (inspired by this recipe)

Ingredients:

For the dressing (makes extra, so save for another salad!):

  • 6 tablespoons extra-virgin olive oil
  • 3 tablespoons freshly squeezed lemon juice
  • 1 small shallot, coarsely chopped
  • 1/4 cup cilantro leaves
  • 1 tsp honey
  • Kosher salt and freshly ground pepper

For the salad:

  • 2 cups arugula
  • 1/2 avocado, cut into thin wedges
  • 2 tbl shelled salted pistachios
  • 8-10 (about 1/2 lb) spears fresh spring asparagus
  • 1/4 cup cilantro leaves
  • shaved parmesan (optional)

Instructions:

  1. In a blender, blend the oil, lemon juice, shallot, honey, and 1/4 cup of the cilantro. Season the dressing with salt and pepper.
  2. Bring a saucepan of salted water to a boil. Fill a bowl with ice water. Cut off 1 inch of the asparagus tips and cut stalks into 2 inch segments.  (If using larger asparagus, cut off 1 inch of the asparagus and cut each tip in half lengthwise. Using a peeler or mandoline, shave the asparagus spears lengthwise.) Blanch the asparagus tips and segments (or strands) in the boiling water until just heated through, 10 seconds. Drain and transfer to the ice water to chill; drain well. Pat dry and transfer to a bowl.
  3. Add the arugula, pistachios and the remaining 1/4 cup of cilantro leaves to the asparagus.  Toss with a little dressing.  Add avocado and parmesan (if using) and drizzle with dressing as desired.  Enjoy!

And as a reward for a looooonnnnggg and tiring week, what better way to forget the week’s worries by indulging in a bowl of chocolate-y goodness?  Which, surprisingly, isn’t all that unhealthy for you, packed w/ fiber, antioxidants, and omega-3s?  Oh, sweet revenge!

Mexican Chocolate Chia Pudding with Strawberries IMG_3373

Ingredients:

  • ¼ cup chia seed
  • 1 cup unsweetened vanilla almond milk (or milk of choice)
  • 5 to 6 medjool dates, seeds removed**
  • 2 to 3 tablespoons cocoa powder (depends on the intensity of the cocoa powder)
  • 1/2 teaspoon vanilla extract (use 1 tsp if using unflavored almond milk)
  • 1/2 to 1 teaspoon cinnamon (depends on how spicy you like your chocolate!)
  • pinch of sea salt

Instructions:

**You need a high-powered blender such as a Vitamix**

  1. Put chia seed in bottom of blender and add almond milk and dates.  Allow chia seed to soak up milk and become gelatinous, at least 60 minutes, but you could also soak it for longer.
  2. Add cocoa powder, cinnamon, vanilla, and salt and blend at high speed until very, very smooth.
  3. Spoon into serving dishes/bowls and refrigerate until set.  Garnish with shaved chocolate and strawberries and enjoy!

** instead of dates, you can also simply use the sweetener of your choice – a little honey or agave syrup would work well!

How do you like your crab cakes?

Apparently, I favor my crab cakes more crab-by with little filler, while J prefers his not quite as dense with crab.  I guess it’s too filling to have less filler, and he’d rather be able to eat more crab cakes!

We have both spent a good amount of time back East, and we both remember gathering with friends to devour bushels of Maryland blue crab smothered in the ubiquitous Old Bay seasoning.  I’m pretty sure the salt content in that rub would send more than several of my patients’ blood pressure through the roof, but in moderation it is very tasty indeed!   Learning to pry open crabs with my fingers, drenching humidity, and the addictive spices in Old Bay seasoning are some of my vivid associations with summers in D.C.

I used a recipe from Cooking Light to make crab cake sliders the other night for dinner, and they were perfect with the warm weather we are having.  After a run along the beach and soaking in the sunshine, these little sliders reminded us that spring break and summer fun are not that far away.  J enjoyed his with a cool, refreshing beer.  I enjoyed mine with extra dill sauce ;).

IMG_3356

Crab Cake Sliders with Yogurt Dill Sauce (recipe adapted from here)

Ingredients:

  • 8 whole-wheat slider buns
  • 1/4 cup rice vinegar
  • 1 tablespoon sugar
  • 1 tablespoon lemon juice (I used Meyer lemon)
  • 1/2 cup thinly vertically sliced red onion
  • 6 tablespoons plain fat-free Greek yogurt, divided
  • 2 tablespoon chopped fresh dill, divided
  • 3/4 cup finely chopped red bell pepper
  • 1/4 teaspoon black pepper
  • 1/4 teaspoon kosher salt, or to taste
  • 2 green onions, chopped
  • 1 large egg, lightly beaten
  • 1 large egg yolk, lightly beaten
  • 2/3 cup whole-wheat panko
  • 8 ounces lump crabmeat, drained and shell pieces removed
  • 4 teaspoons canola oil
  • 1 1/2 cups baby arugula or mixed baby greens

Instructions:

1. Preheat broiler to high. Hollow out buns, leaving a 1/2-inch-thick shell. Arrange buns in a single layer on a baking sheet. Broil 1 1/2 minutes on each side or until lightly toasted. **

2. Place 1/4 cup vinegar and sugar in a microwave-safe bowl. Microwave at HIGH for 45 seconds. Stir in red onion. Let stand 15 minutes. Drain.

3. Combine  1 tablespoon lemon juice, 3 tablespoons yogurt, and  1 tablespoon dill in a small bowl.  Season with salt and pepper to taste.

4. Combine remaining 3 tablespoons yogurt, 1 tablespoon dill, bell pepper, and next 5 ingredients (through yolk). Add panko and crab, stirring to combine. Working with damp hands, divide crab mixture into 8 equal portions, shaping each into a 3/4-inch-thick patty.

5. Heat a large nonstick skillet over medium-high heat. Add oil to pan; swirl to coat. Add crab cakes to pan; cook 4 minutes on each side or until golden and thoroughly heated.

6. Spread 1 teaspoon yogurt mixture on bottom half of each bun. Top with 1 patty. Divide onions and arugula among sliders. Top with top halves of buns.

**J wanted to use fluffier bread for the crab cakes, so we used a cookie cutter to cut rounds from garlic naan bread, which we then pan-toasted until lightly crispy on the outside to use in lieu of hamburger buns.  

Let them eat…carrots!

Roasted rainbow carrots with toasted cumin and a blood orange vinaigrette, to be exact!

I should have celebrated 3.14.15 (Pi) day with pie, but we somehow didn’t get around to that with all of the other festivities planned for my birthday.  Nor did we have cake, which I guess is a little odd but not missed.  It was the first birthday J and I were able to celebrate together in the same place, so he took it upon himself to plan it all.  Knowing how I’ve missed my friends while in NYC, he somehow managed to gather people from all different phases of my life (college, SF/residency, NYC/fellowship) for fun and food.  As it so happens, my college roommate’s birthday is Pi day, so we were able to celebrate with her, too.  We were just missing pie!  Between dim sum, macarons, wine flights, and late – night tapas, however, there was no time (or calorie deficit) to allow for pie (or cake).

Amidst all the indulgences of the weekend, it was so nice to cleanse the palate with something a little lighter, which somehow bridges the winter-spring transition quite nicely using winter citrus and root vegetables, for perhaps the last time.  I’ve always loved having a March birthday – it’s always a month of hope regardless of where you live, as the vestiges of winter are shaken off and spring warmth slowly seeps in.  We lose some of that seasonality in CA, but even here you can feel the difference as March roars in but leaves gentle green buds in its wake.

This late winter salad, inspired by Ludo Lefebvre’s Roasted Carrot Salad, surprised J into saying “You may make me into a vegetarian yet.”  Carrots are a great source of beta-carotene and vitamin A.  Enjoy!

Roasted Rainbow Carrot Salad with Blood Orange Vinaigrette

IMG_3352 IMG_3353

Ingredients:

For the carrots:

  • ½ teaspoon ground cumin
  • 1-1½ pounds small rainbow carrots, approximately 5 inches in length, scrubbed clean and tops trimmed (if using larger carrots, peel and slice into sticks about 4-5 inches in length)
  • 1 bay leaf 
  • 6 cloves of unpeeled garlic, smashed (use more if you like garlic)
  • 5 to 7 sprigs fresh thyme
  • 2 tablespoons olive oil
  •  Kosher salt and freshly ground black pepper to taste

For the blood orange vinaigrette:

  • 2 blood oranges, juiced
  • 1 tablespoon white vinegar
  • 1 tablespoon granulated sugar
  • ½ teaspoon kosher salt
  •  cup extra-virgin olive oil

For the cumin crema:

  • 1 cup nonfat greek yogurt (Fage)
  • 1 tablespoon fresh lemon juice
  • 2 teaspoons ground cumin
  •  Pinch kosher salt

For the salad:

  • ½ small red onion, thinly sliced
  • 1 tablespoon roughly chopped roasted almonds
  • 2 blood oranges, cut into supremes
  • 3-4 tablespoons of chopped herbs: parsley, tarragon, chervil, or chives
  •  Kosher salt or fleur de sel

Instructions:

  1. Preheat oven to 400. Toast the cumin for both the carrots and the yogurt in a small pan set over medium heat until it becomes aromatic. Remove from heat, and set aside.
  2. Mix together the carrots, bay leaf, smashed garlic, thyme and olive oil in a bowl. Sprinkle 1/2 teaspoon cumin over the carrots, and mix again.
  3. Tip the carrot mixture onto a sheet pan, and spread evenly into one layer.  Season with salt and pepper and place in oven. Roast until the carrots are soft and beginning to caramelize, 30 to 45 minutes.
  4. Remove carrots from oven, discard aromatics and set aside to cool.
  5. Meanwhile, make the vinaigrette. Combine blood-orange juice, vinegar, sugar and salt in a large mixing bowl, and whisk to incorporate. Slowly add the olive oil while continuing to whisk, until the dressing is emulsified. Add the carrots to the bowl, and toss to combine.
  6. Make the cumin crema by combining the nonfat Fage greek yogurt, lemon juice and remaining toasted cumin in a mixing bowl.  Stir well to combine.  Add a pinch of salt.
  7. Assemble the salad on a large serving plate. Put the cumin crema in the center of the plate, and using the back of a spoon, spread it evenly across the bottom. Arrange the carrots on top of the greek yogurt. Sprinkle the onion and the nuts on top of the carrots, then add the supremes of blood orange. Sprinkle the herbs across the top of the salad, and finish with a pinch or two of salt. Make a mess when serving, so that everyone gets plenty of the cumin crema along with the vegetables.